Table of Contents
If you need to ship 600 labeled boxes or packages each day, how long does it take you to plan routes if you manually type in the addresses one by one in your multi-stop route planner?
It’ll take longer than a couple of minutes, right?
Yet, you’re busy and can’t spend hours either. Furthermore, it’s a tiring and error-prone task.
So, Route4Me has come up with a solution to the problem: An in-app address scanner for both Android and iPhone users. We explain this new feature in detail below.
What Does the In-App Address Scanner Do?
Route4Me’s in-app address scanner comes with optical character recognition (OCR) technology. This helps you scan the address on each package within minutes, suggests geocoded address options to choose from, and lets you instantly add scanned addresses to new or planned routes.
Multi-Stop Route Planner App


What Benefits Does the In-App Address Scanner Offer?
There are many benefits to this feature. Here’s a quick rundown.
- You don’t need another scanner app, OCR software, came scanners, or document scanner apps for mobile scanning and text recognition. So, no more hassles juggling a route planner and a scanner app.
- It can scan any alphanumeric code and even converts handwriting into digital text just like a dedicated OCR app would do.
- The in-app address scanner can pick up and scan addresses from any surface as well as in different fonts or even from handwritten text.
- It helps you scan incorrect or incomplete addresses and automatically geocodes the scanned data and provides multiple address options for you to choose from.
This means that you can scan an address with only the street number, and the route planner app will process the scanned text and suggest all the available geocoded addresses.
How Do You Use the In-App Address Scanner on Android?
You can use the OCR address scanner with ease by following the steps below.
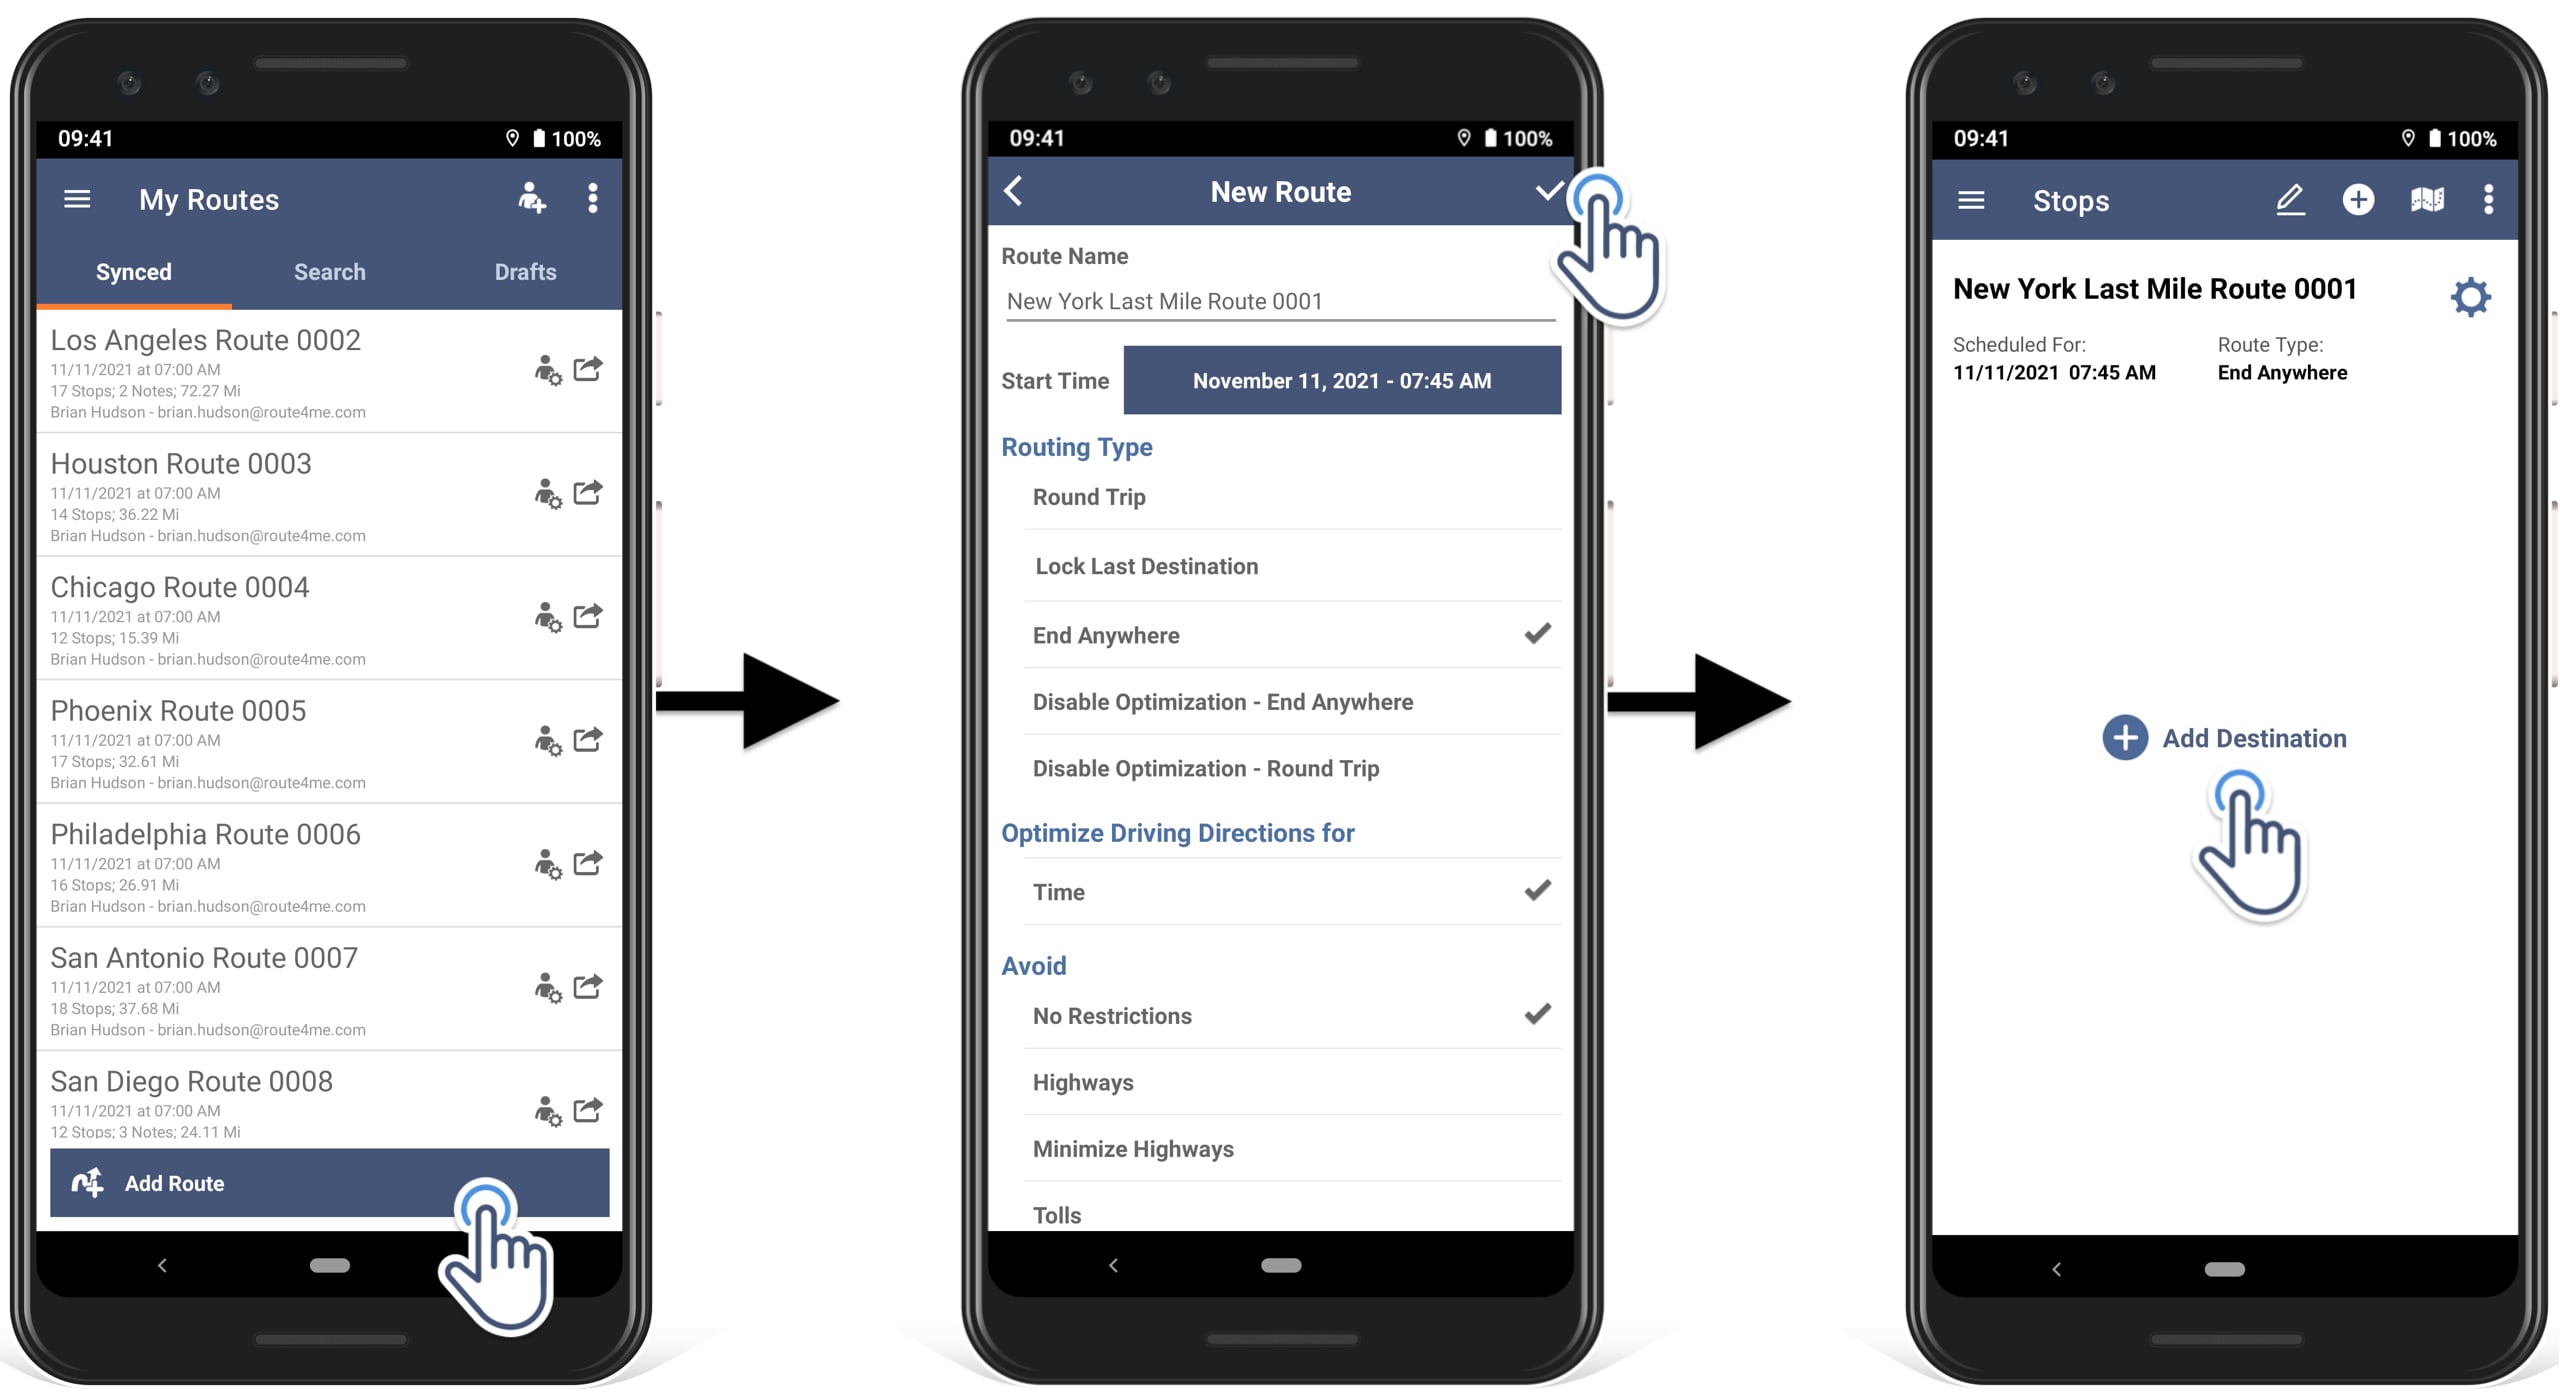
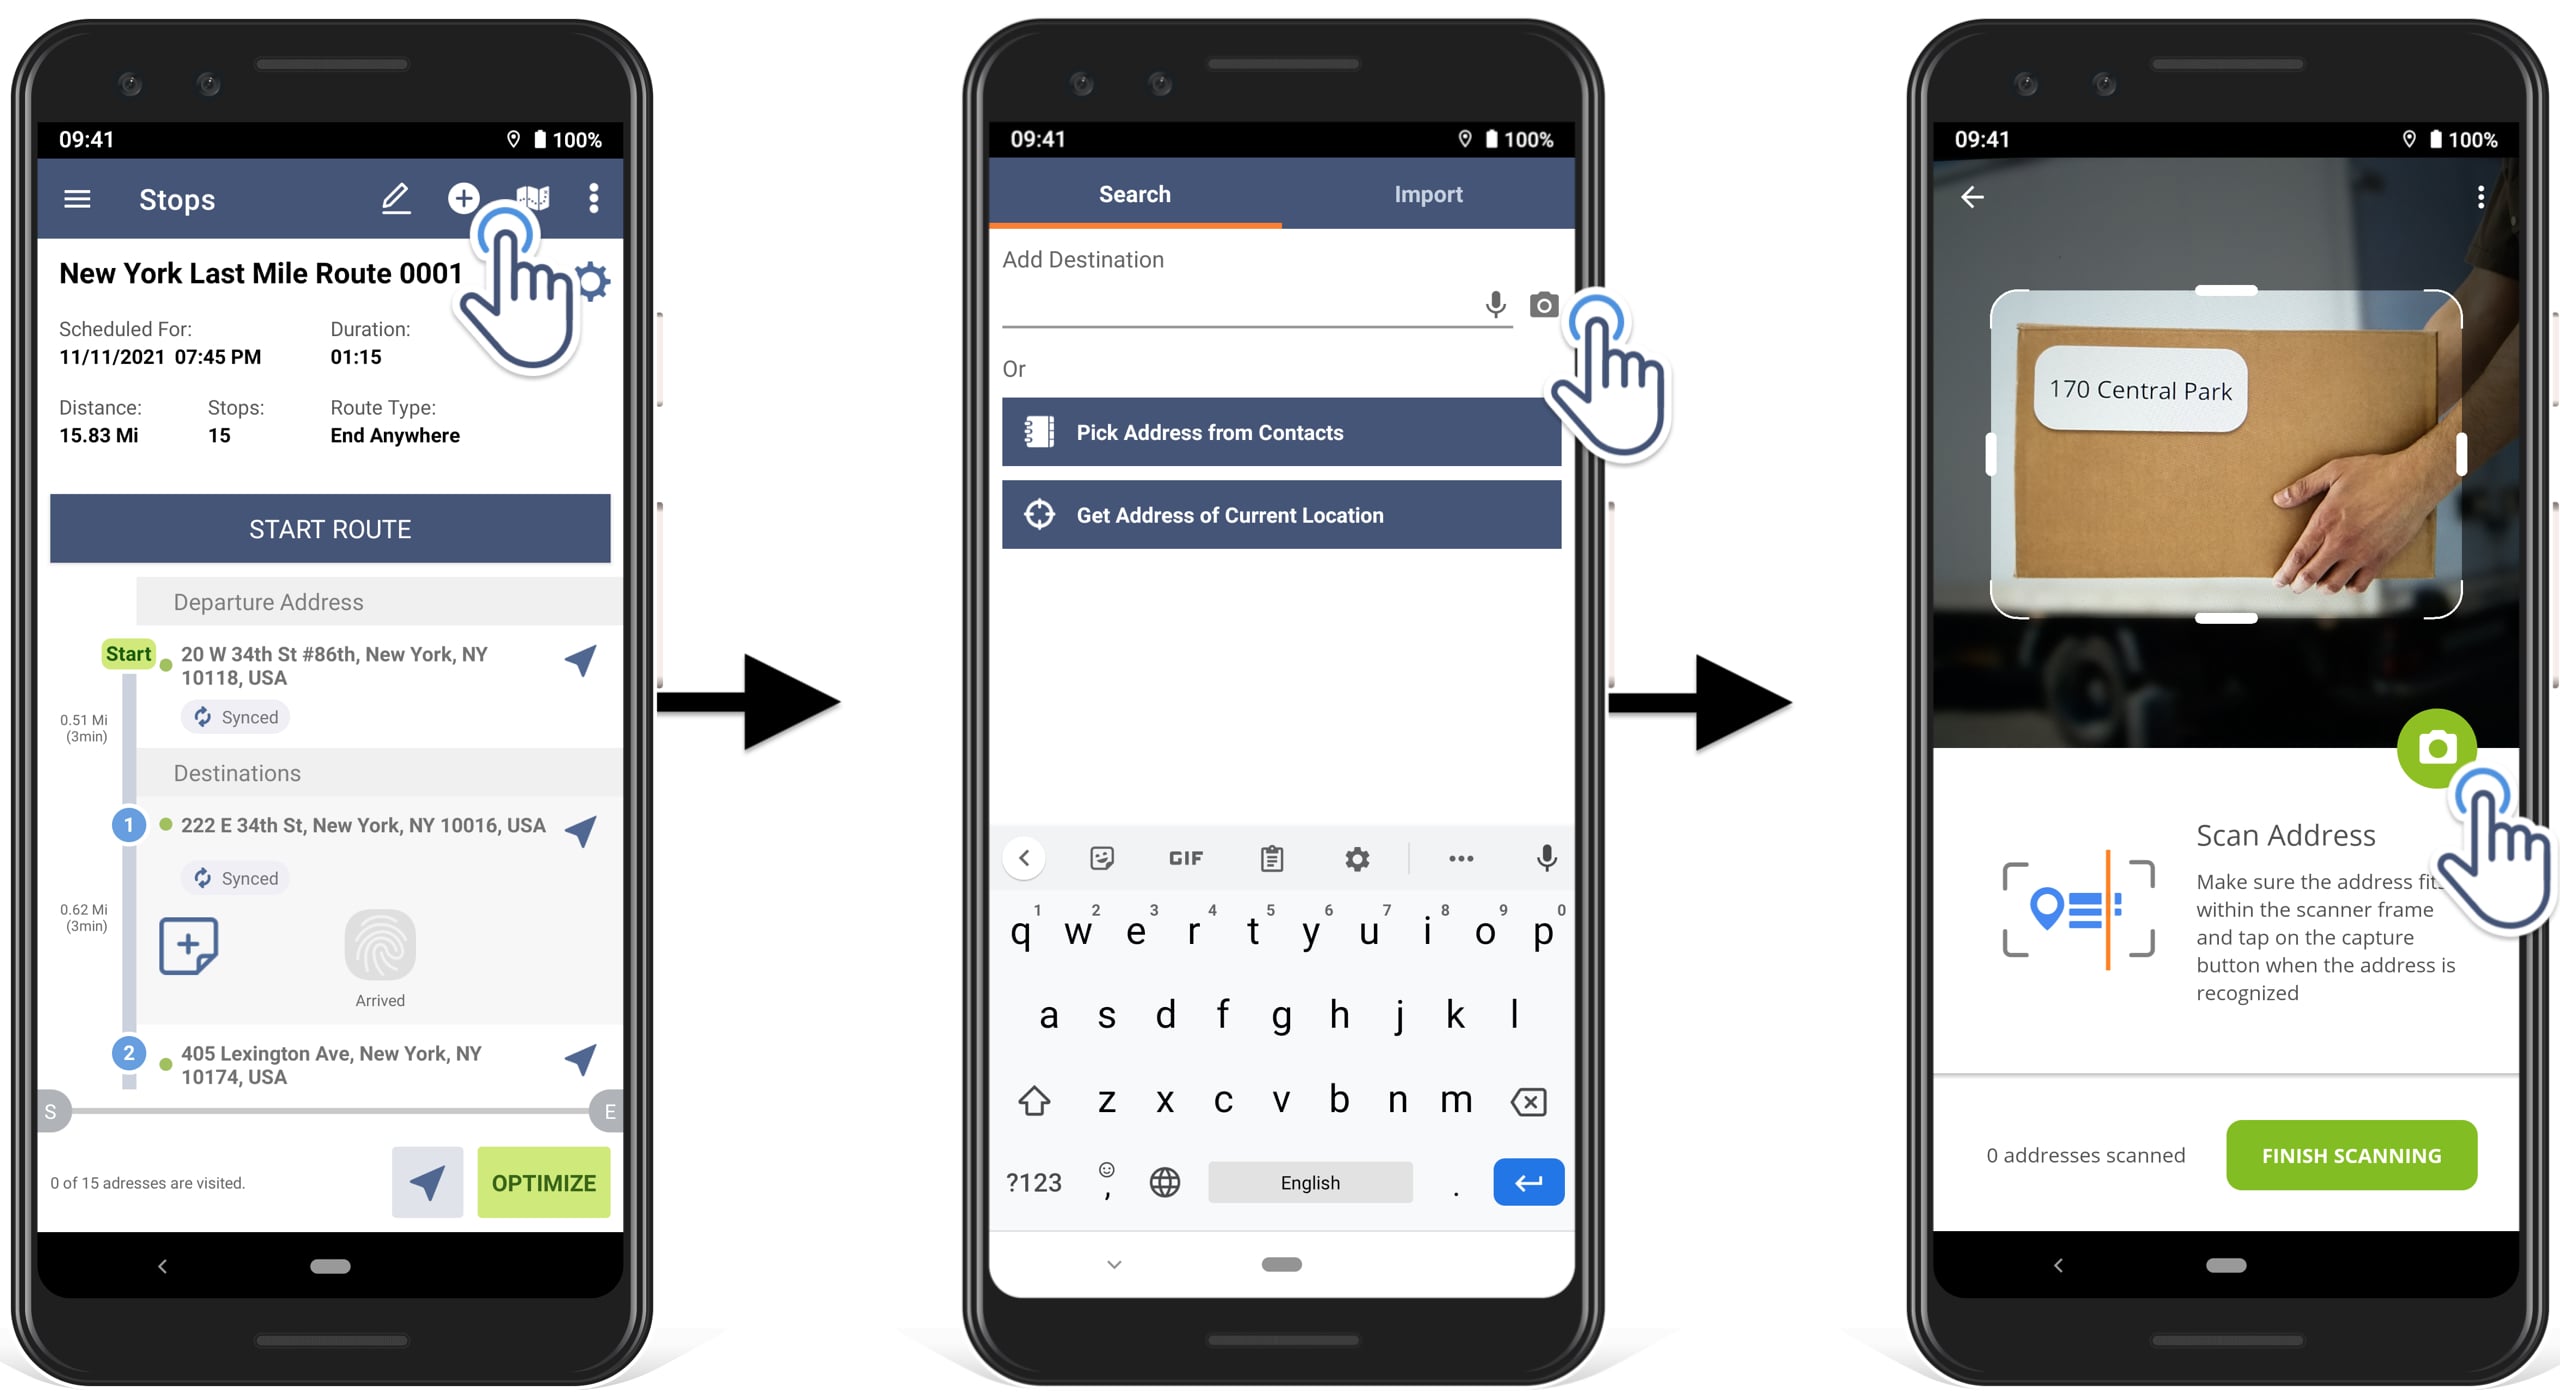
1. Go to My Routes from the navigation menu and tap on the Add Route button.
2. Specify the preferred route optimization settings, schedule the route, and add a route name. Tap on the checkmark icon in the top right corner of the route planner to save the route settings, and then tap on the Add Destination button to start adding addresses with the in-app OCR scanner.
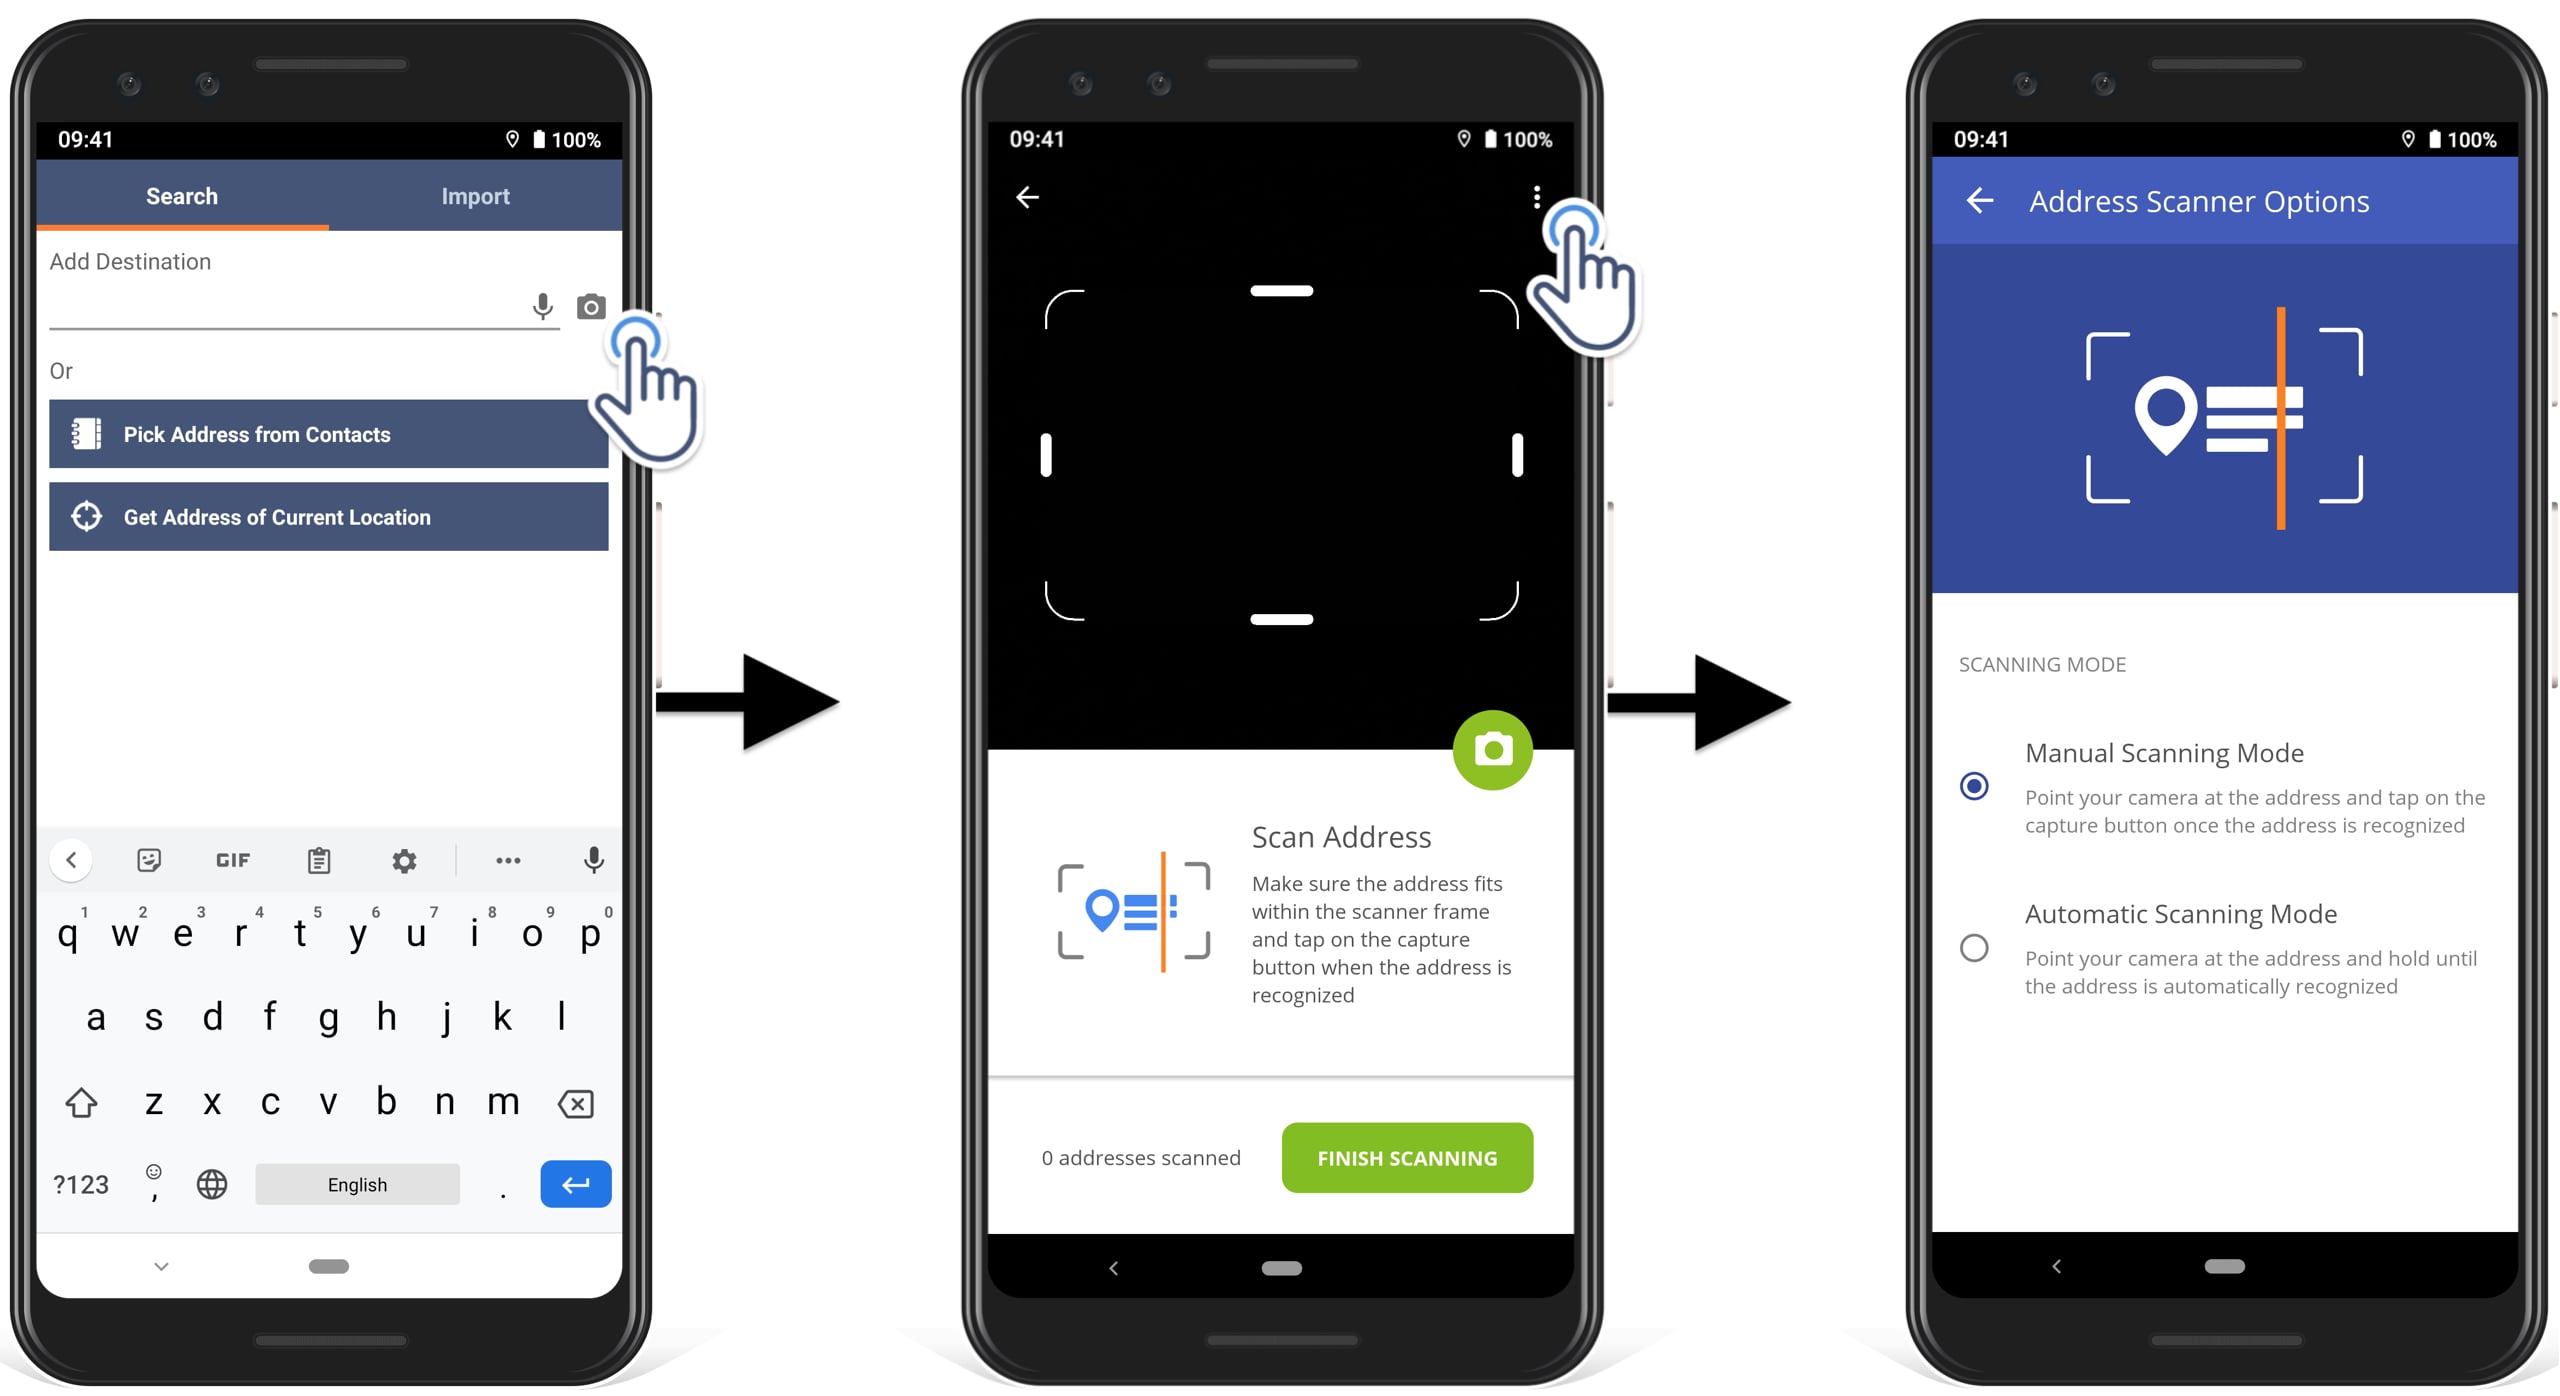
3. To use the address cam scanner, tap on the camera icon in the top right corner of the Android route planner. Next, adjust the address scanner setting to your preference:
a. Manual Scanning Mode: Point your camera at the address and tap on the capture button once the address has been recognized.
b. Automatic Scanning Mode: Point your camera at the address and hold until the address is automatically recognized.
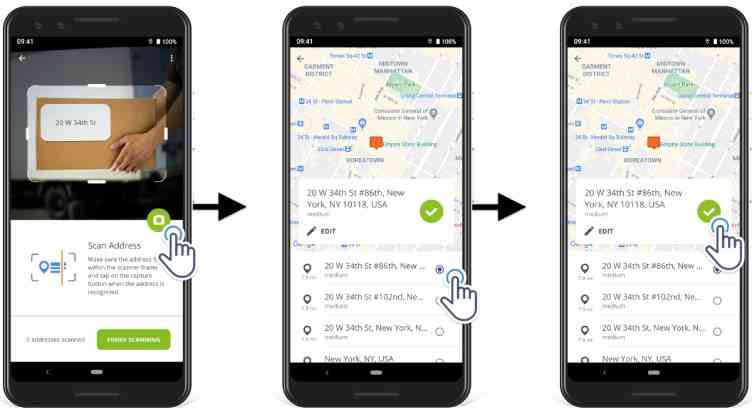
4. To scan the address, point the OCR scanner at the address and make sure that the address fits within the cam scanner frame. Next, tap on the capture button, or (depending on your settings) the address will automatically be scanned and captured.
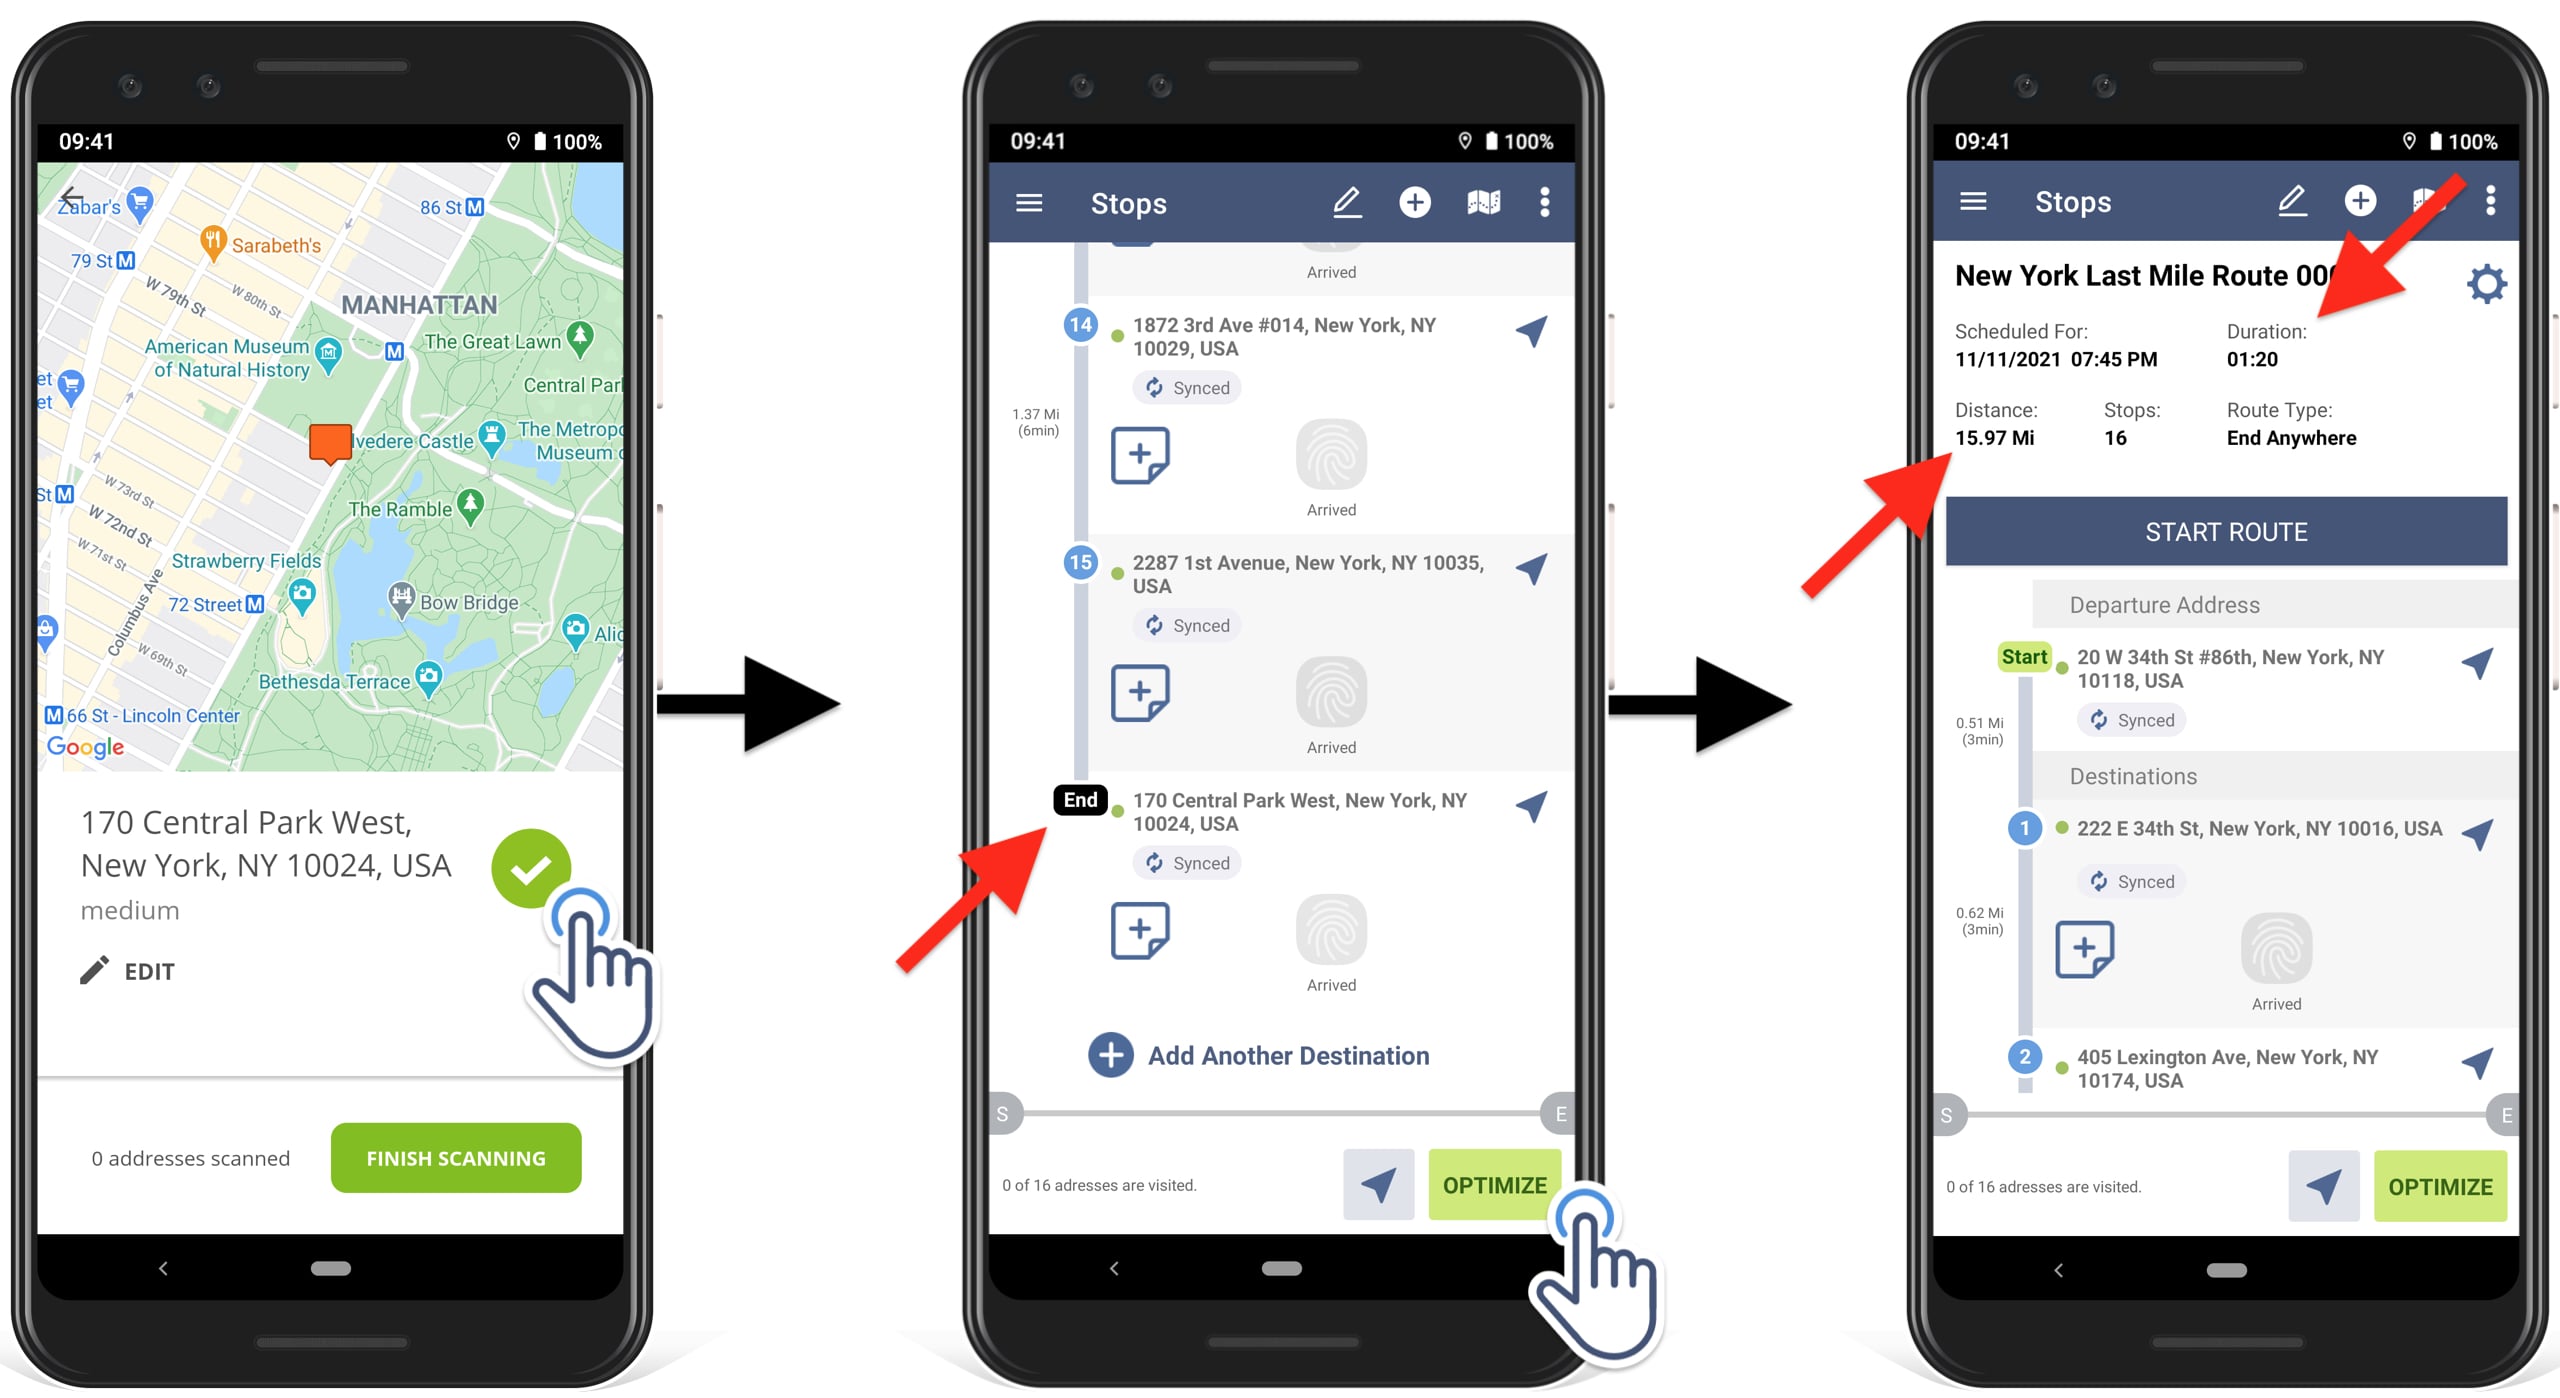
5. Once the address is scanned, select one of the suggested geocoded address options and tap on the checkmark icon to save the scanned address.
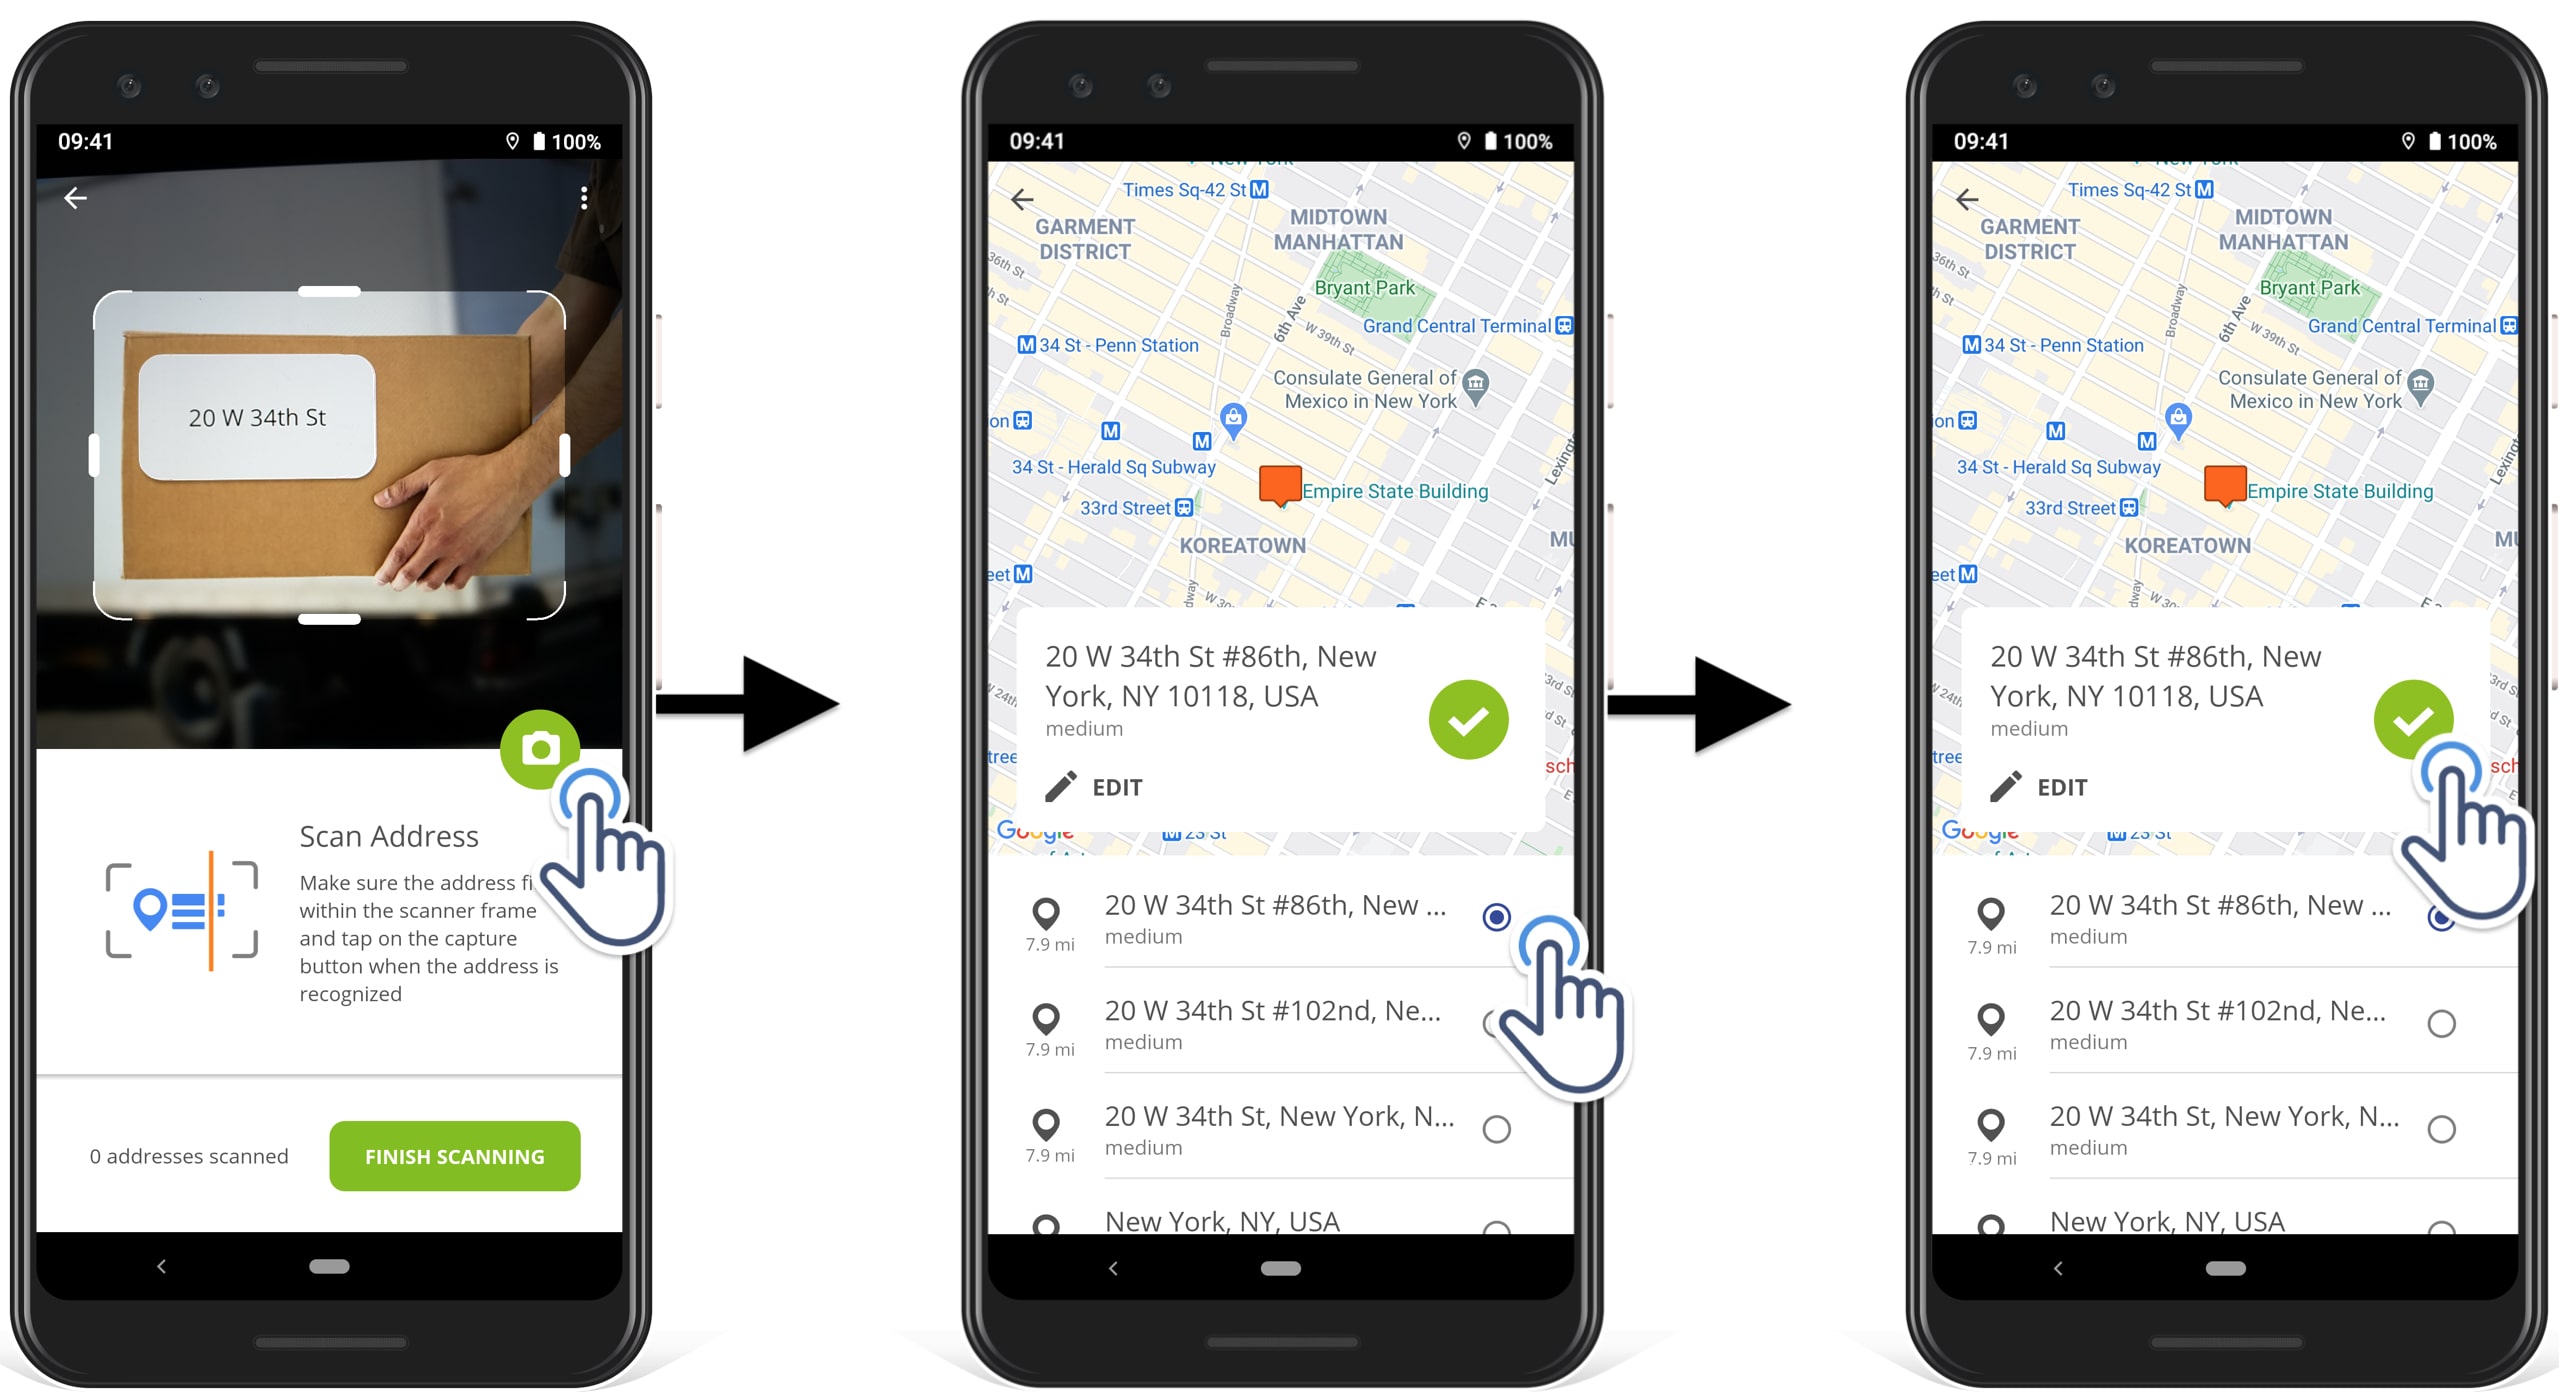
To edit a scanned address, tap on the Edit button, make the preferred changes and select one of the suggested geocoded addresses to add to the route.

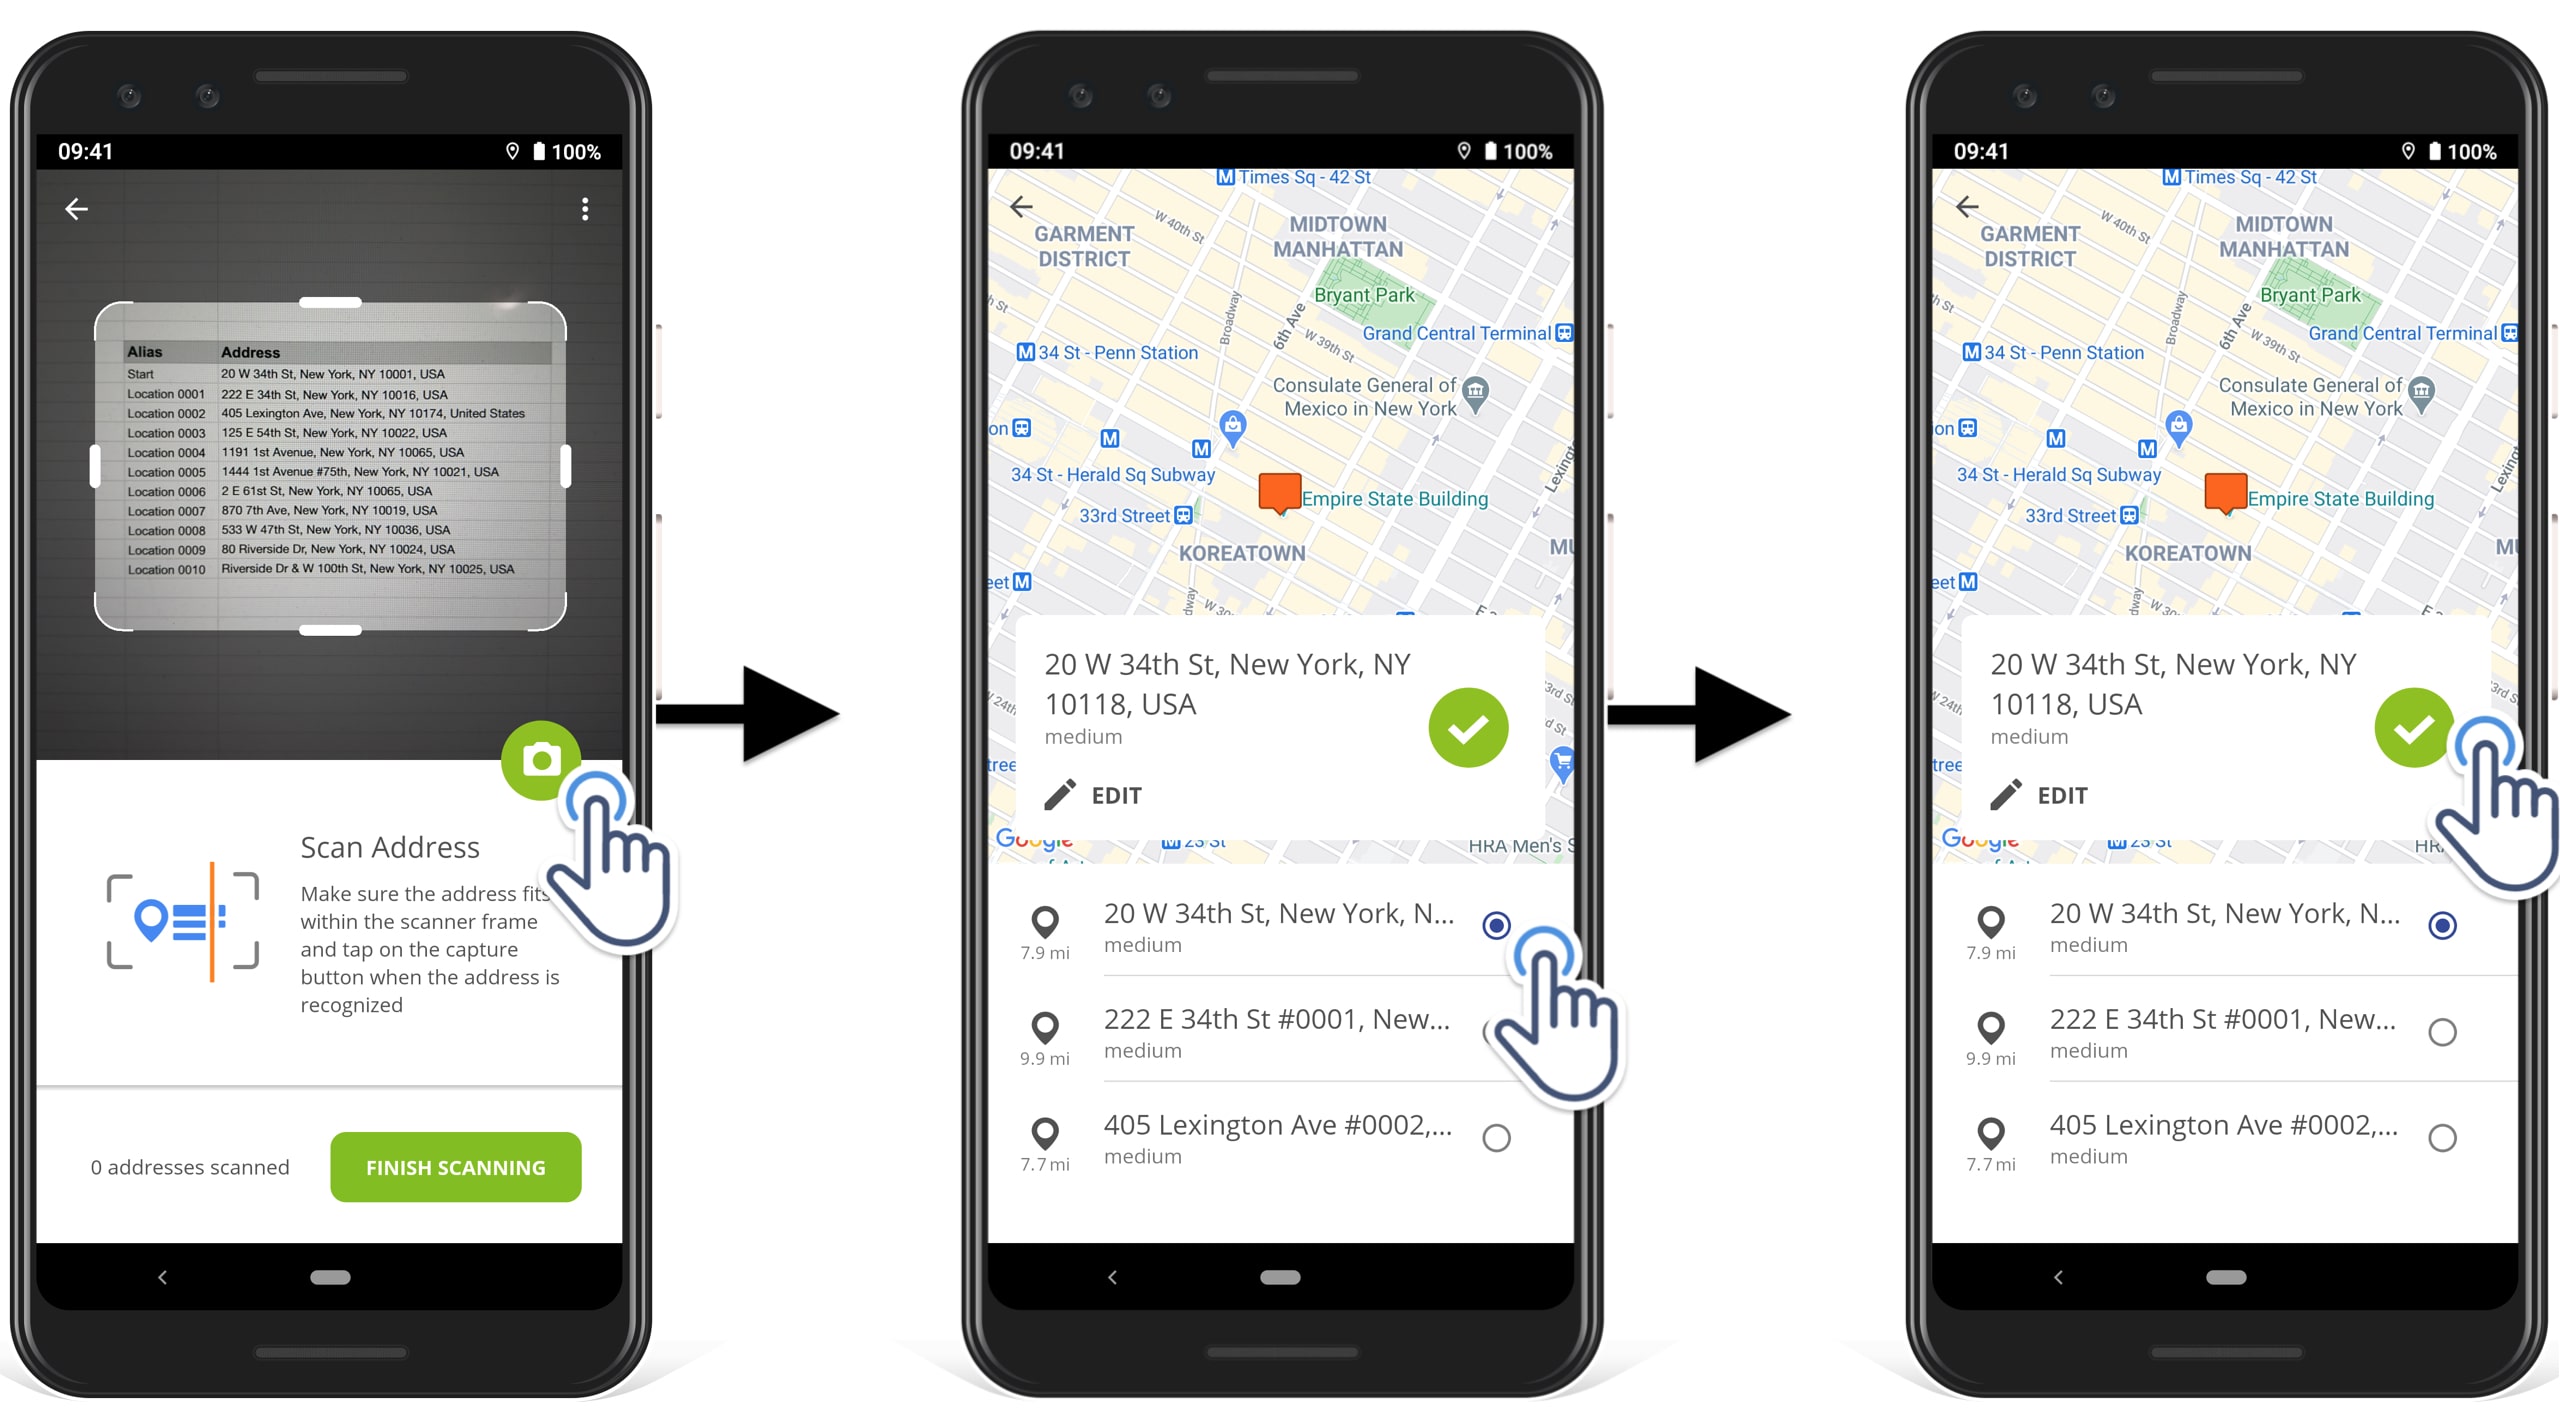
Route4Me’s address scanner can pick up and recognize addresses from different types of surfaces, texts, lists, maps, etc.
For example, you can scan a spreadsheet with multiple addresses and other route details, and the app will automatically pick up all recognizable addresses.
After scanning a surface with multiple addresses, the app will allow you to choose already geocode addresses from all recognized addresses.
How Do You Plan a Route Using the Scanned Address?
Planning the fastest route to work, using the scanned addresses, is a cakewalk.
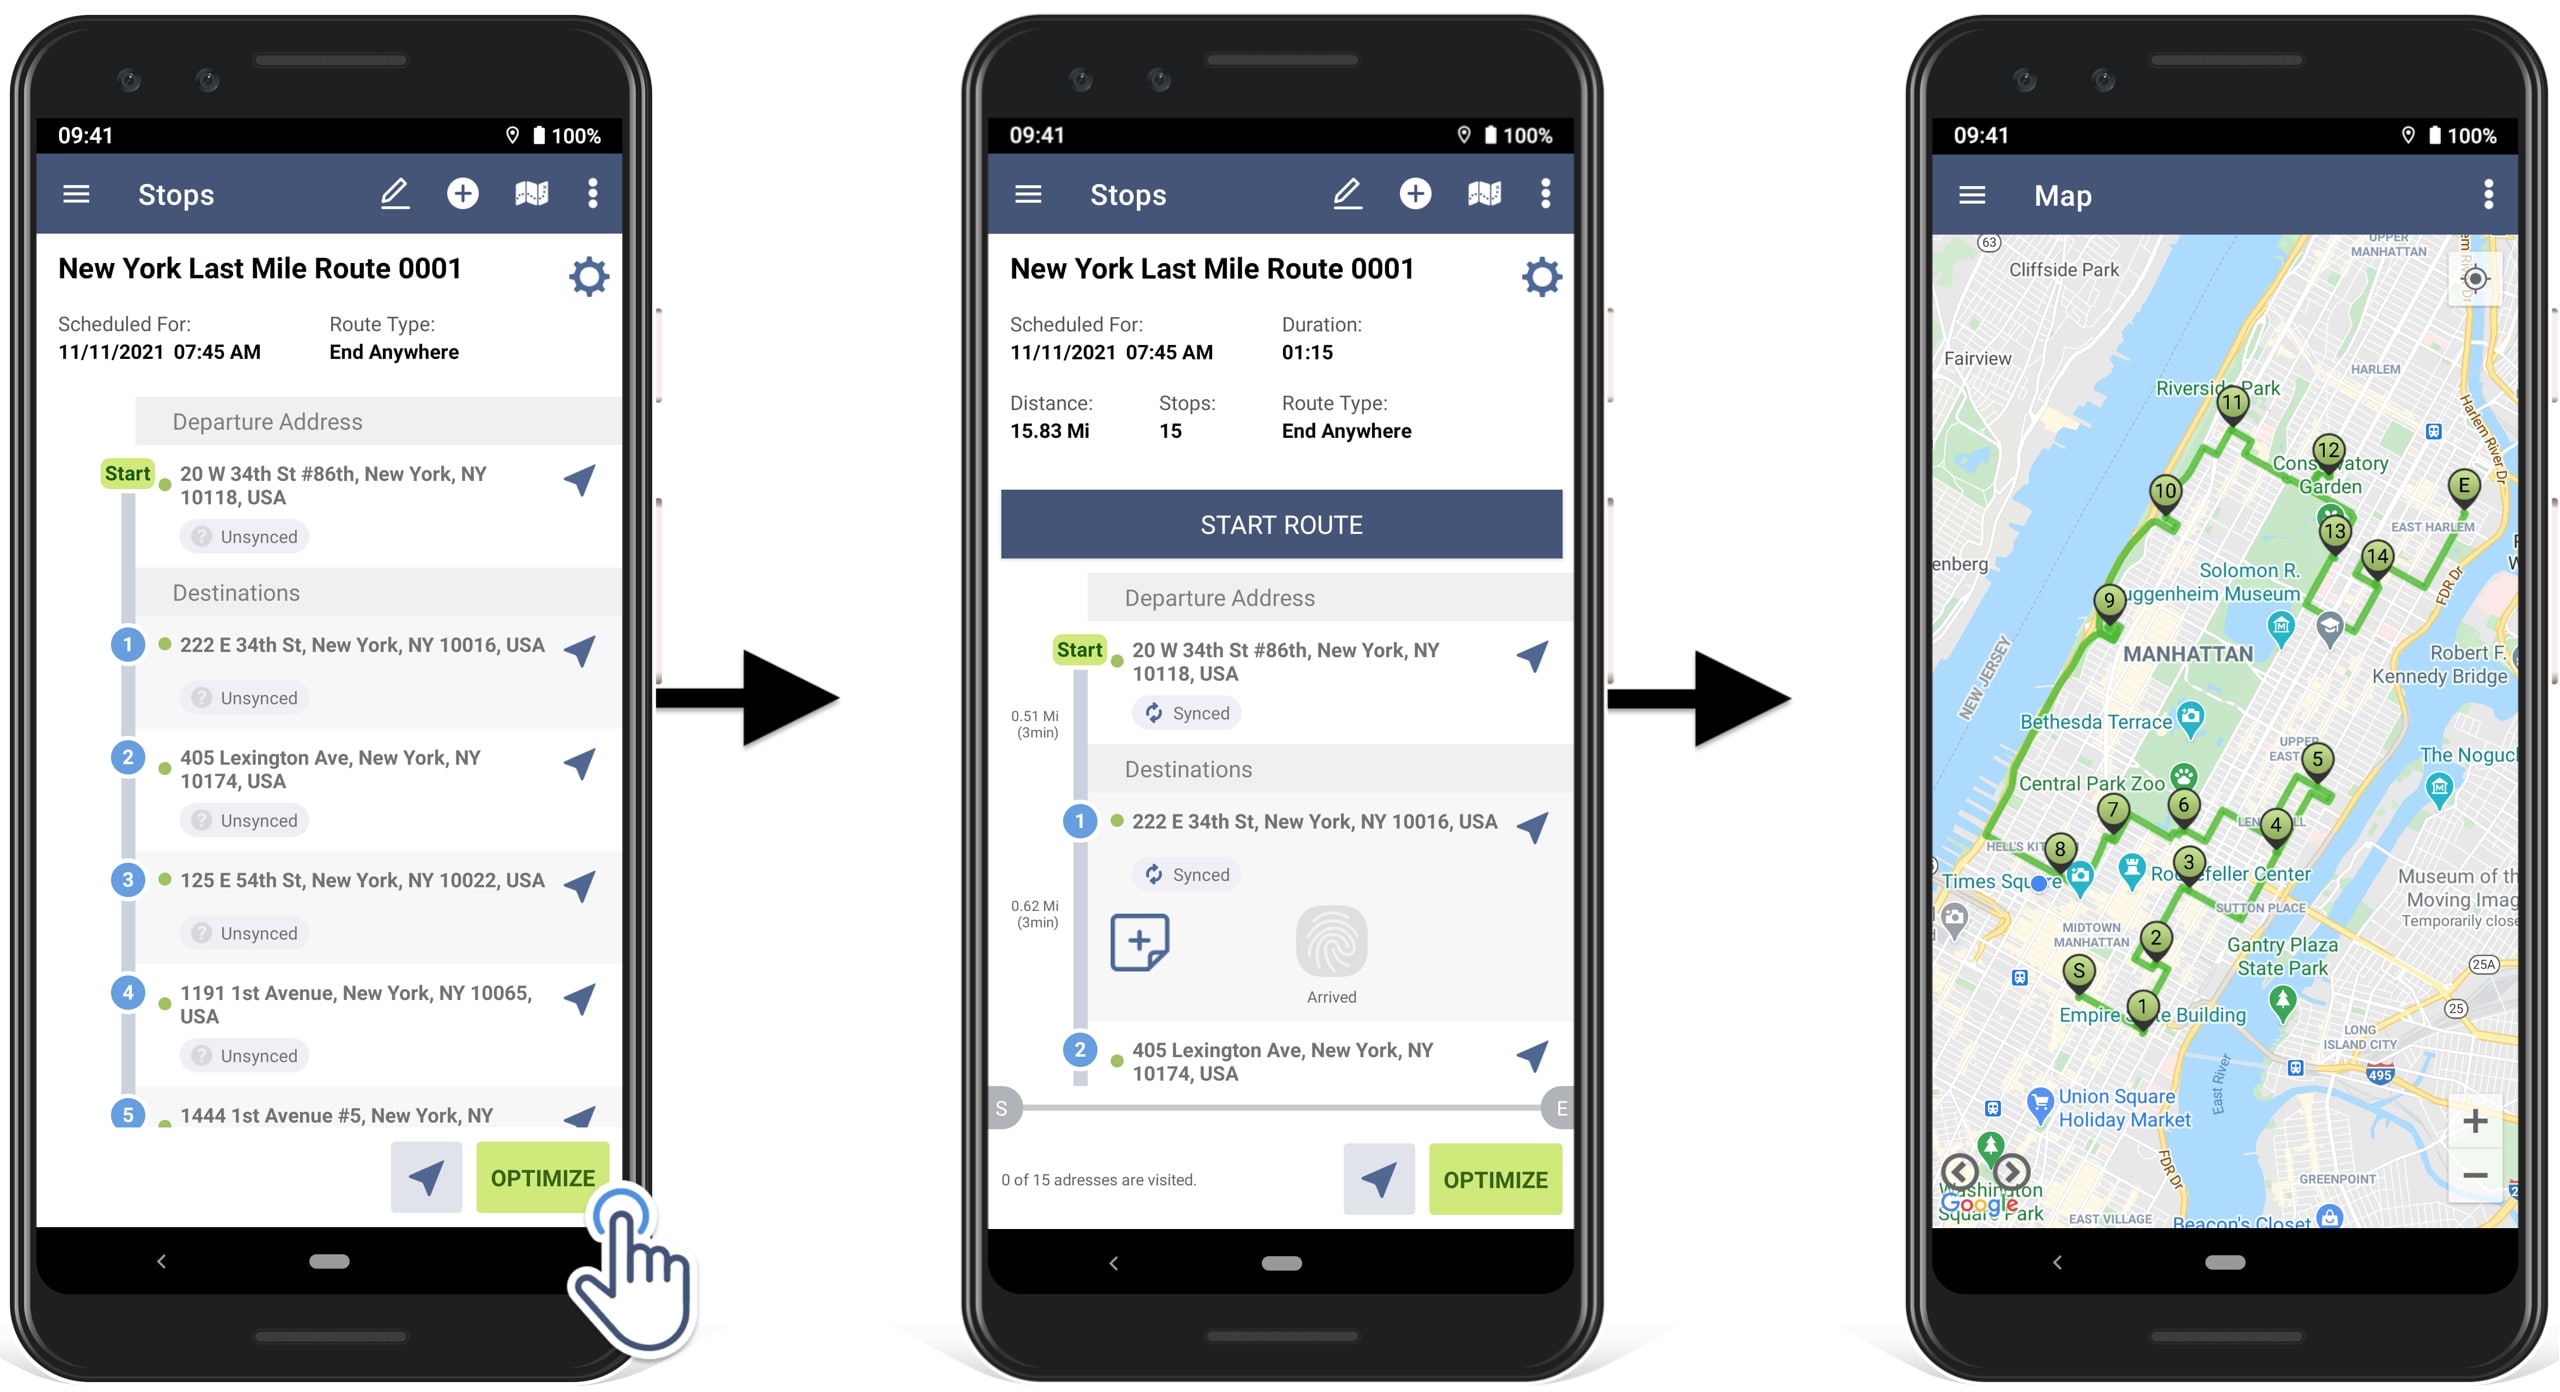
To add the scanned address to the route, tap on the Finish Scanning button and then go back to the route to see the scanned address in the route. The first scanned address is added to the route as the start, stop, or depot (the route’s start address).
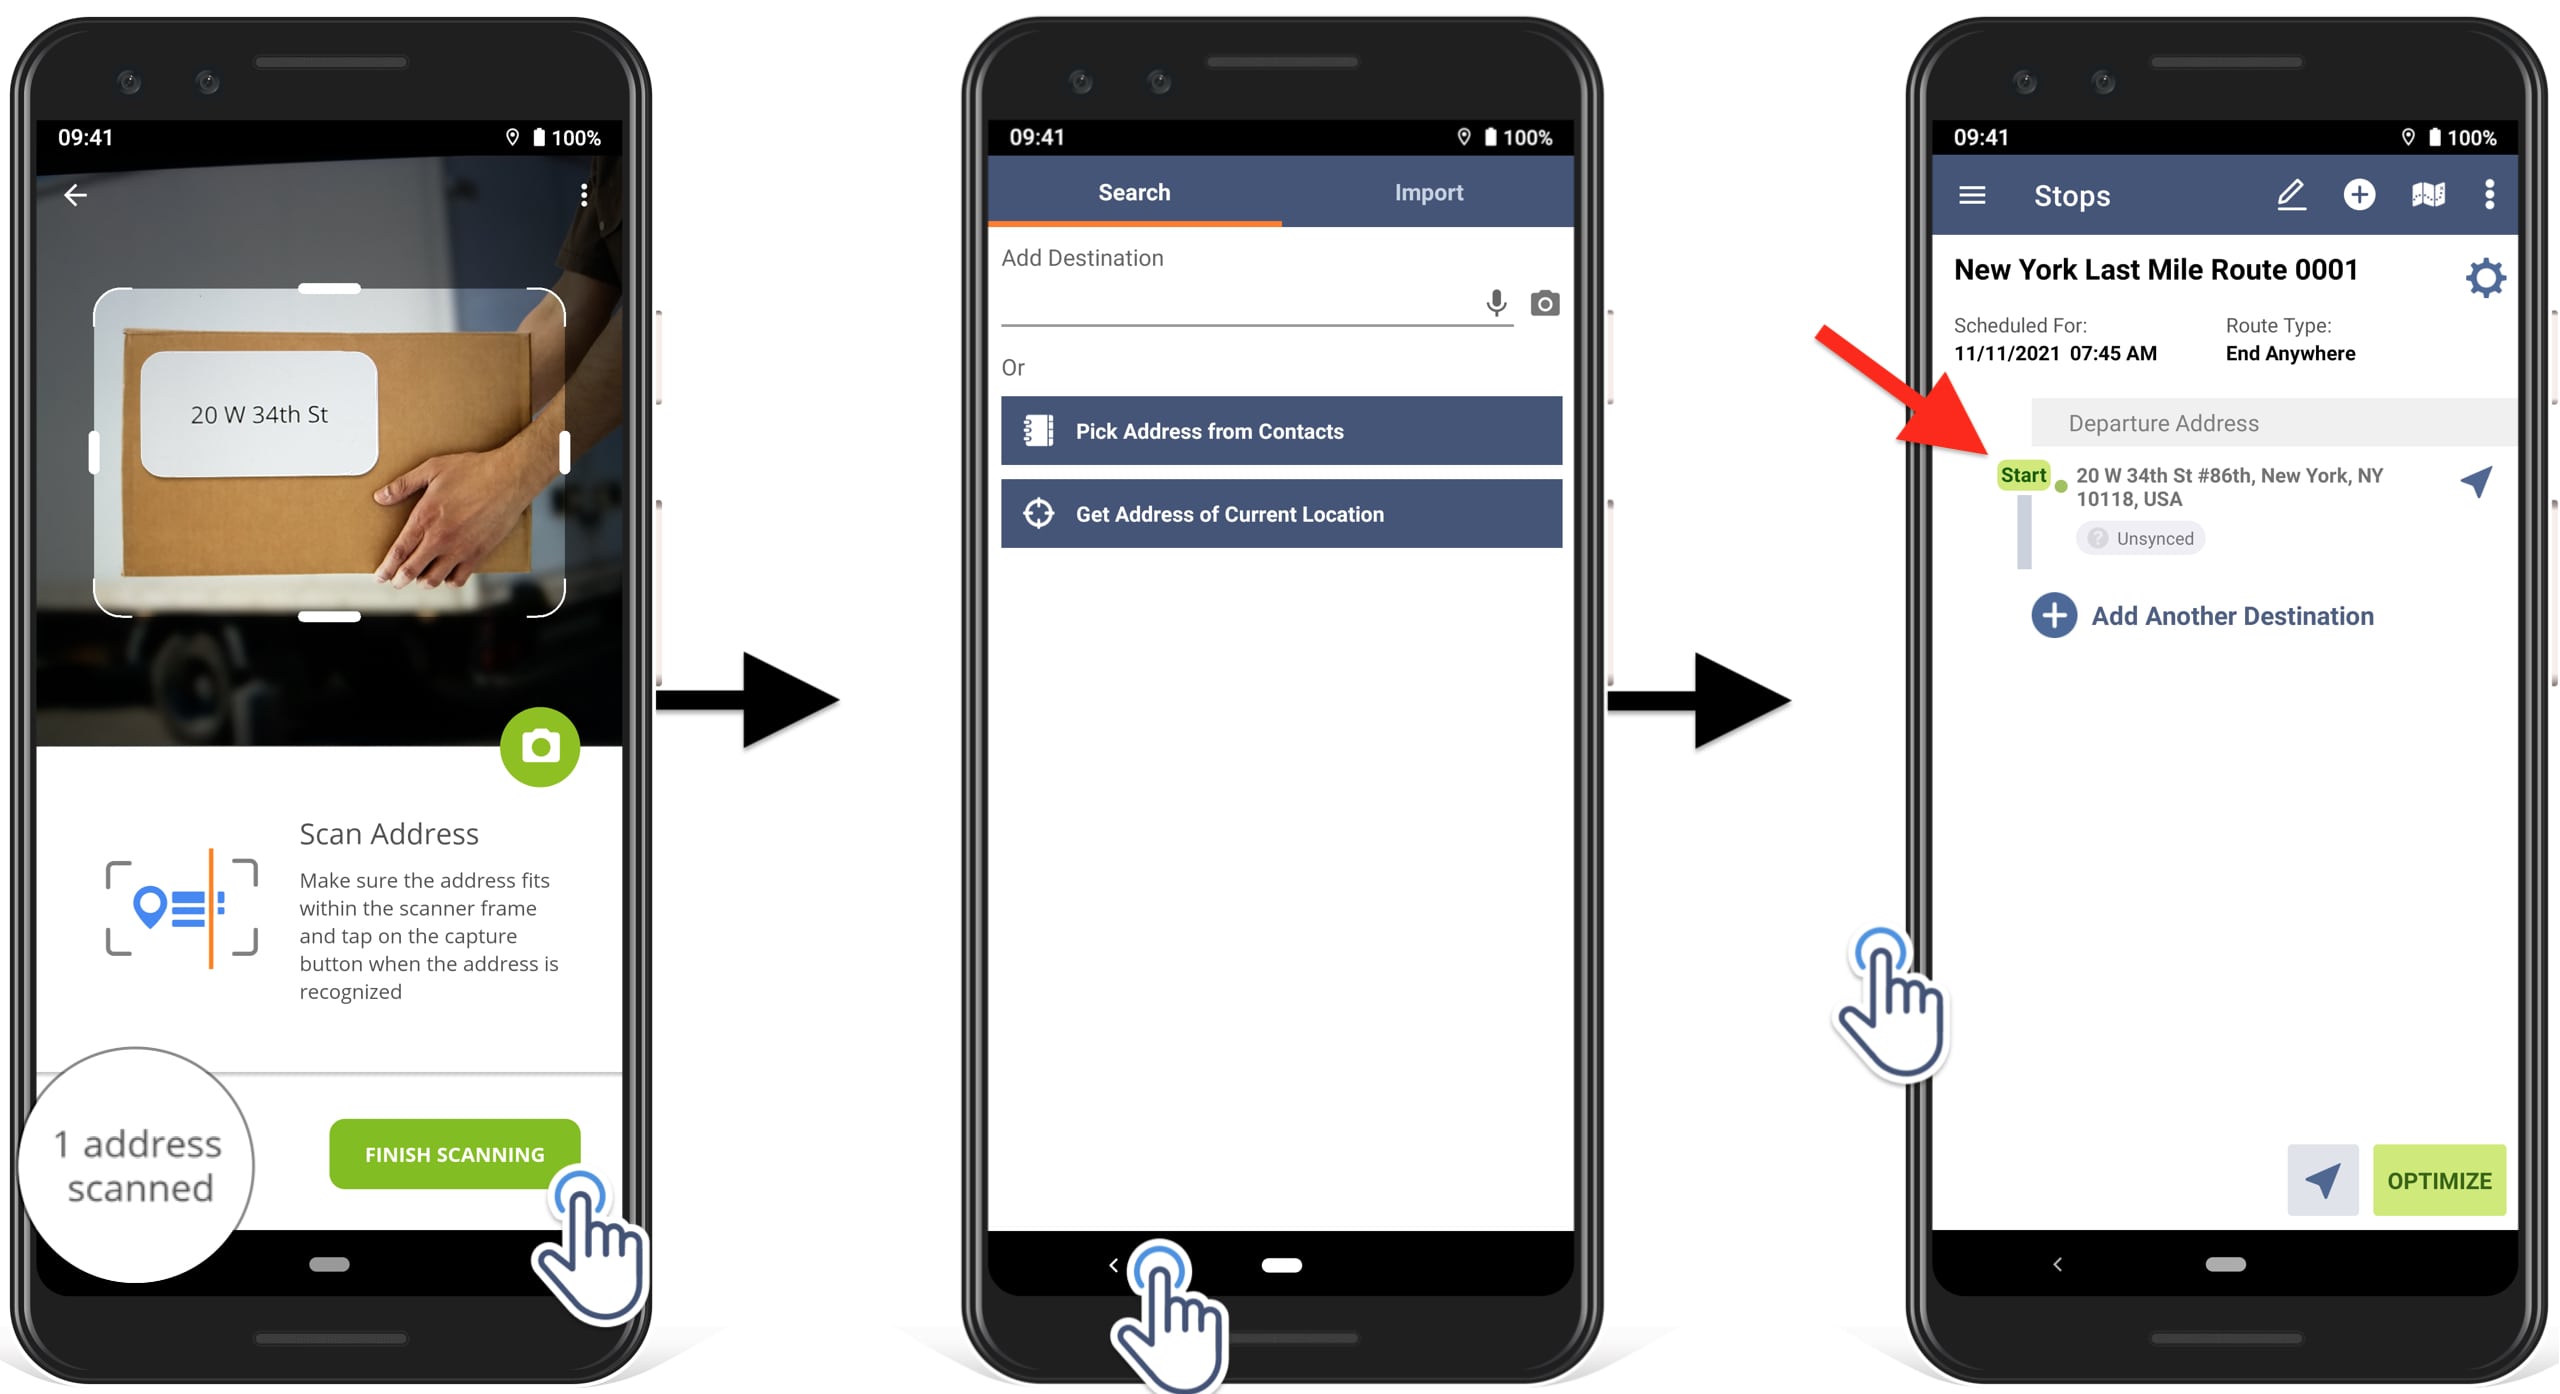
You can scan multiple addresses at a time to simultaneously add multiple scanned addresses to the route. The total number of all the addresses scanned in one session is displayed in the bottom left corner of the scanned address.
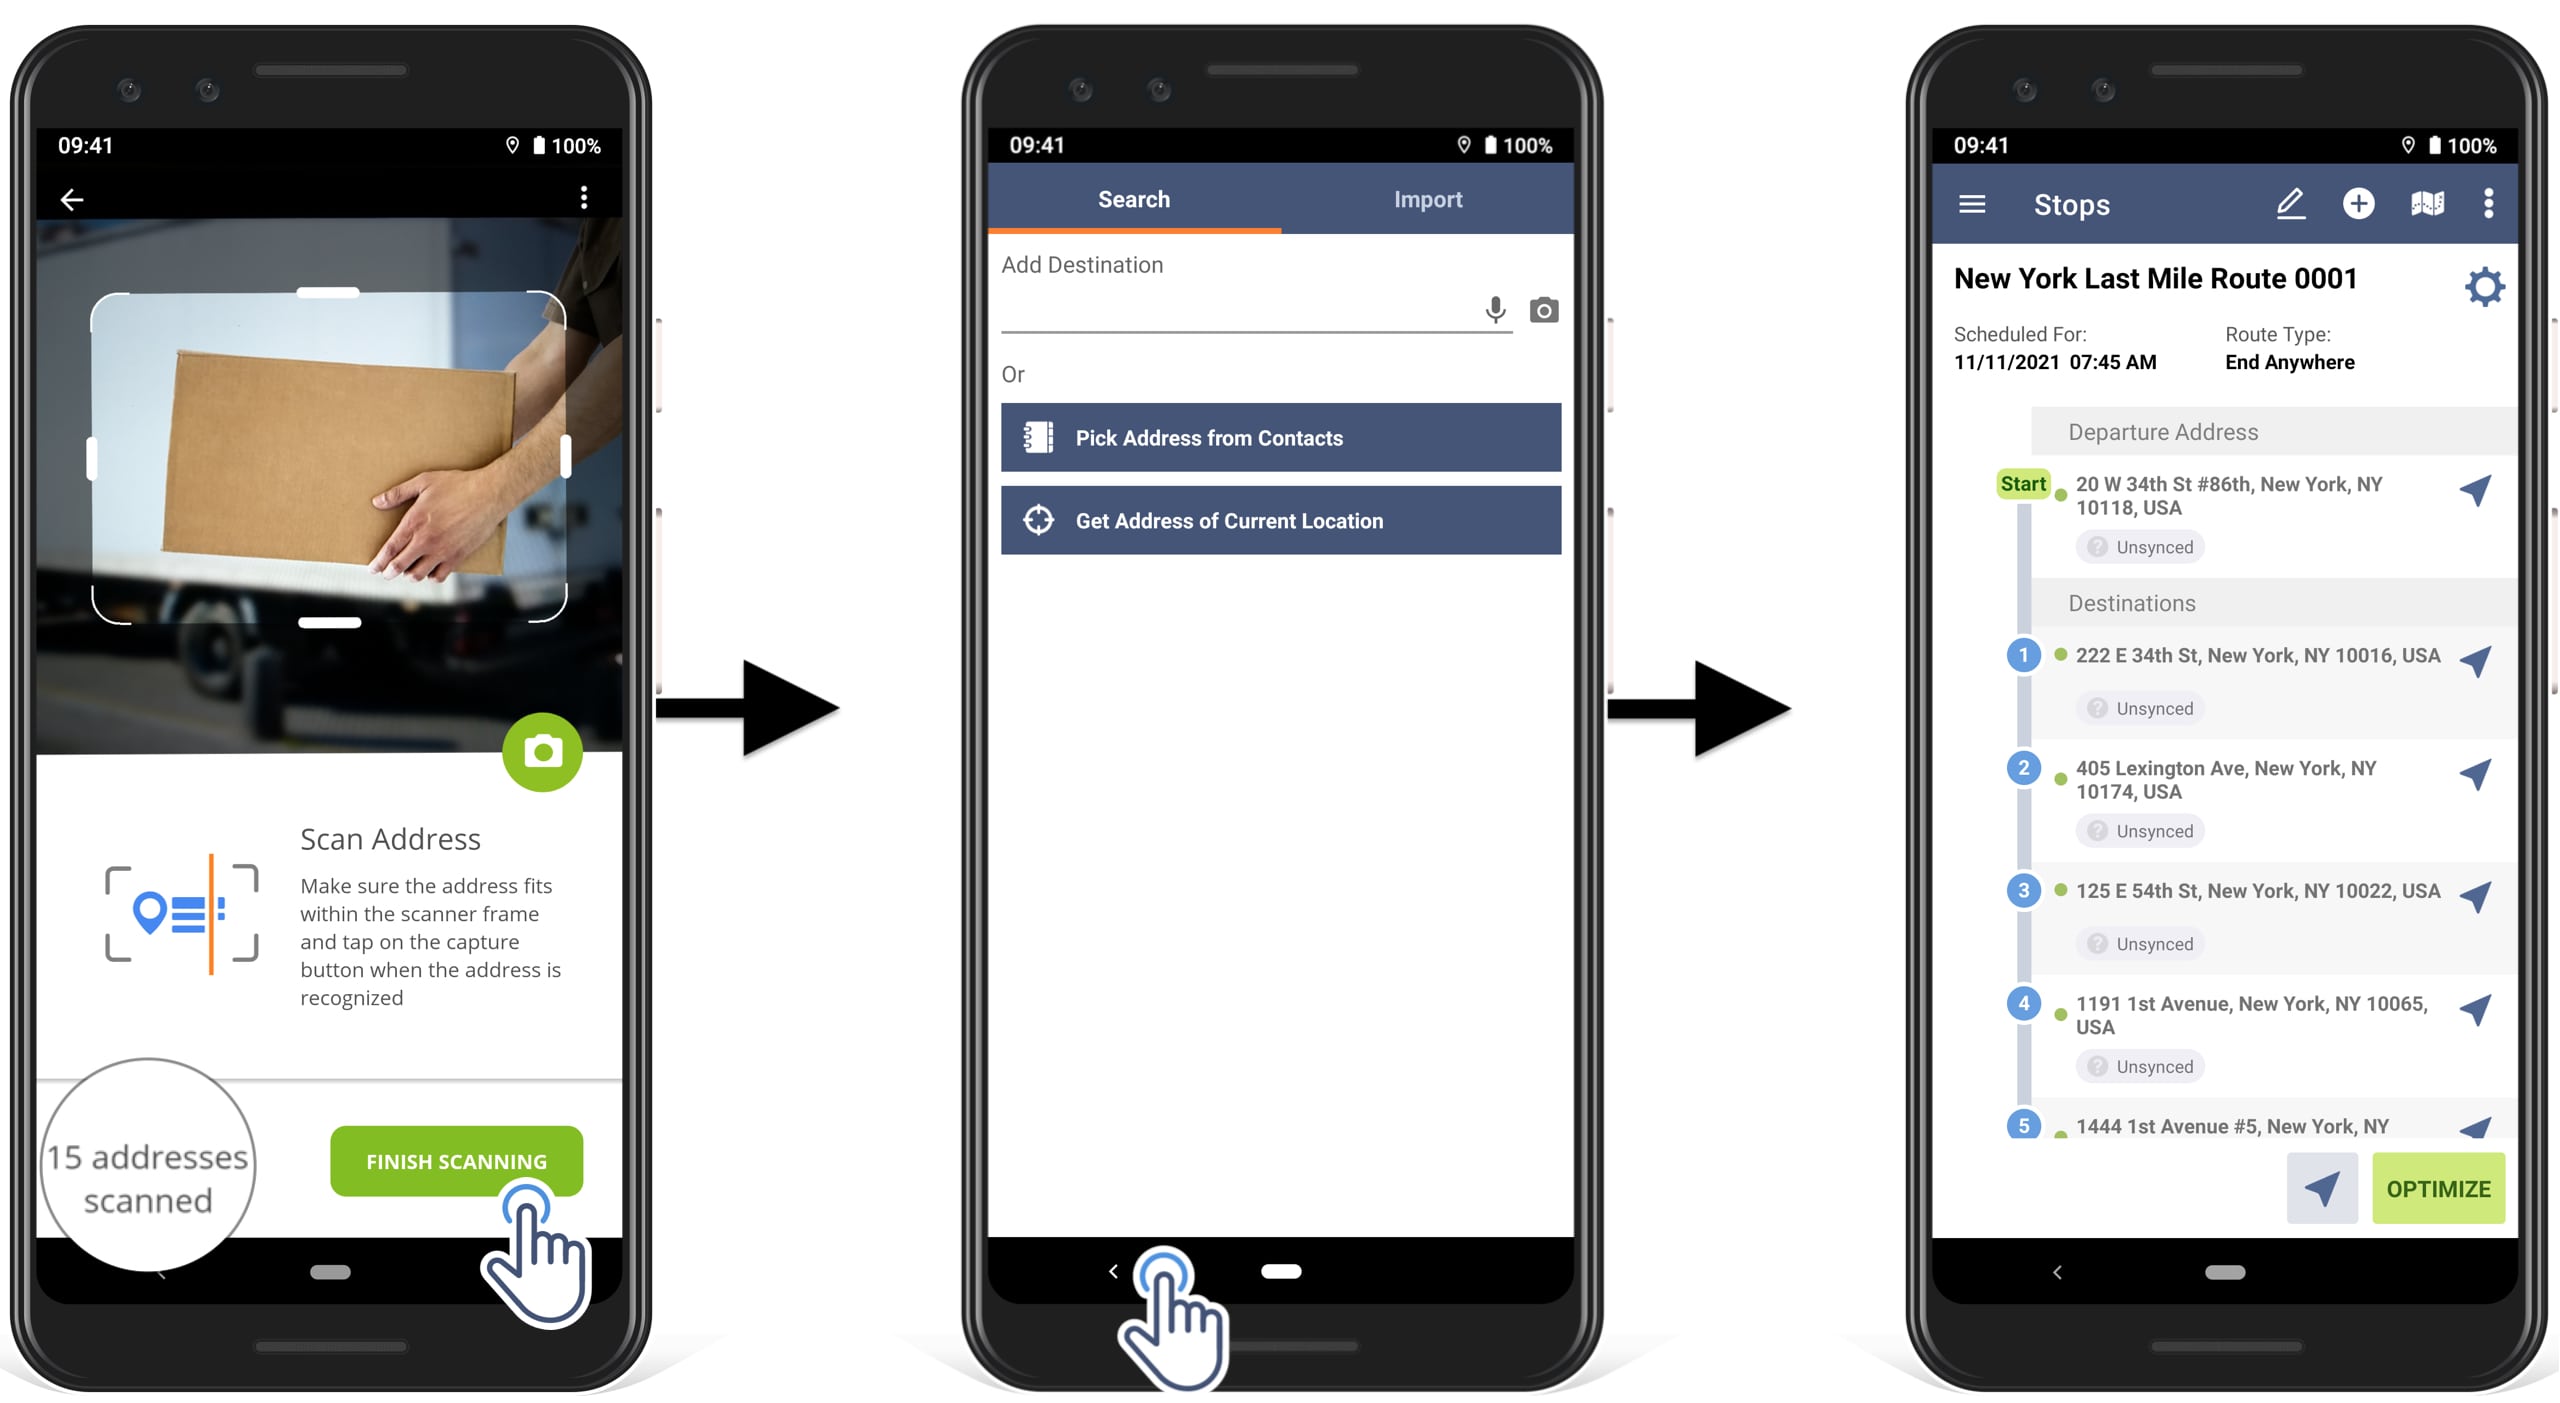
After you have scanned and added the preferred addresses, tap on the Optimize button to optimize all the scanned addresses into a route.
Once the route has been planned, you can start navigating this route, using in-app voice-guided navigation.
How Can You Scan and Add Addresses to Already Planned Routes?
You can use the OCR address scanner to scan and add addresses to already planned and add them to dispatched routes. To add addresses to a planned route, using the address scanner, follow the steps below:
1. On the Stops screen of a planned route, tap on the Plus button in the top right corner of the route planner.
2. Tap on the camera icon in the top right corner of the app, and then scan and add the preferred addresses to the route.
All new scanned addresses are added to the planned route as the last stops, in the same sequence as they are added.
After you’ve added the new addresses to the planned route, you can optimize the route to get the most efficient turn-by-turn driving directions and visitation sequence.
To re-optimize, the planned route with the new addresses, tap on the Optimize button. Once the route has been reoptimized, all new scanned addresses will be placed in the most efficient position on the route.
How Do You Use the In-App Address Scanner on iOS?
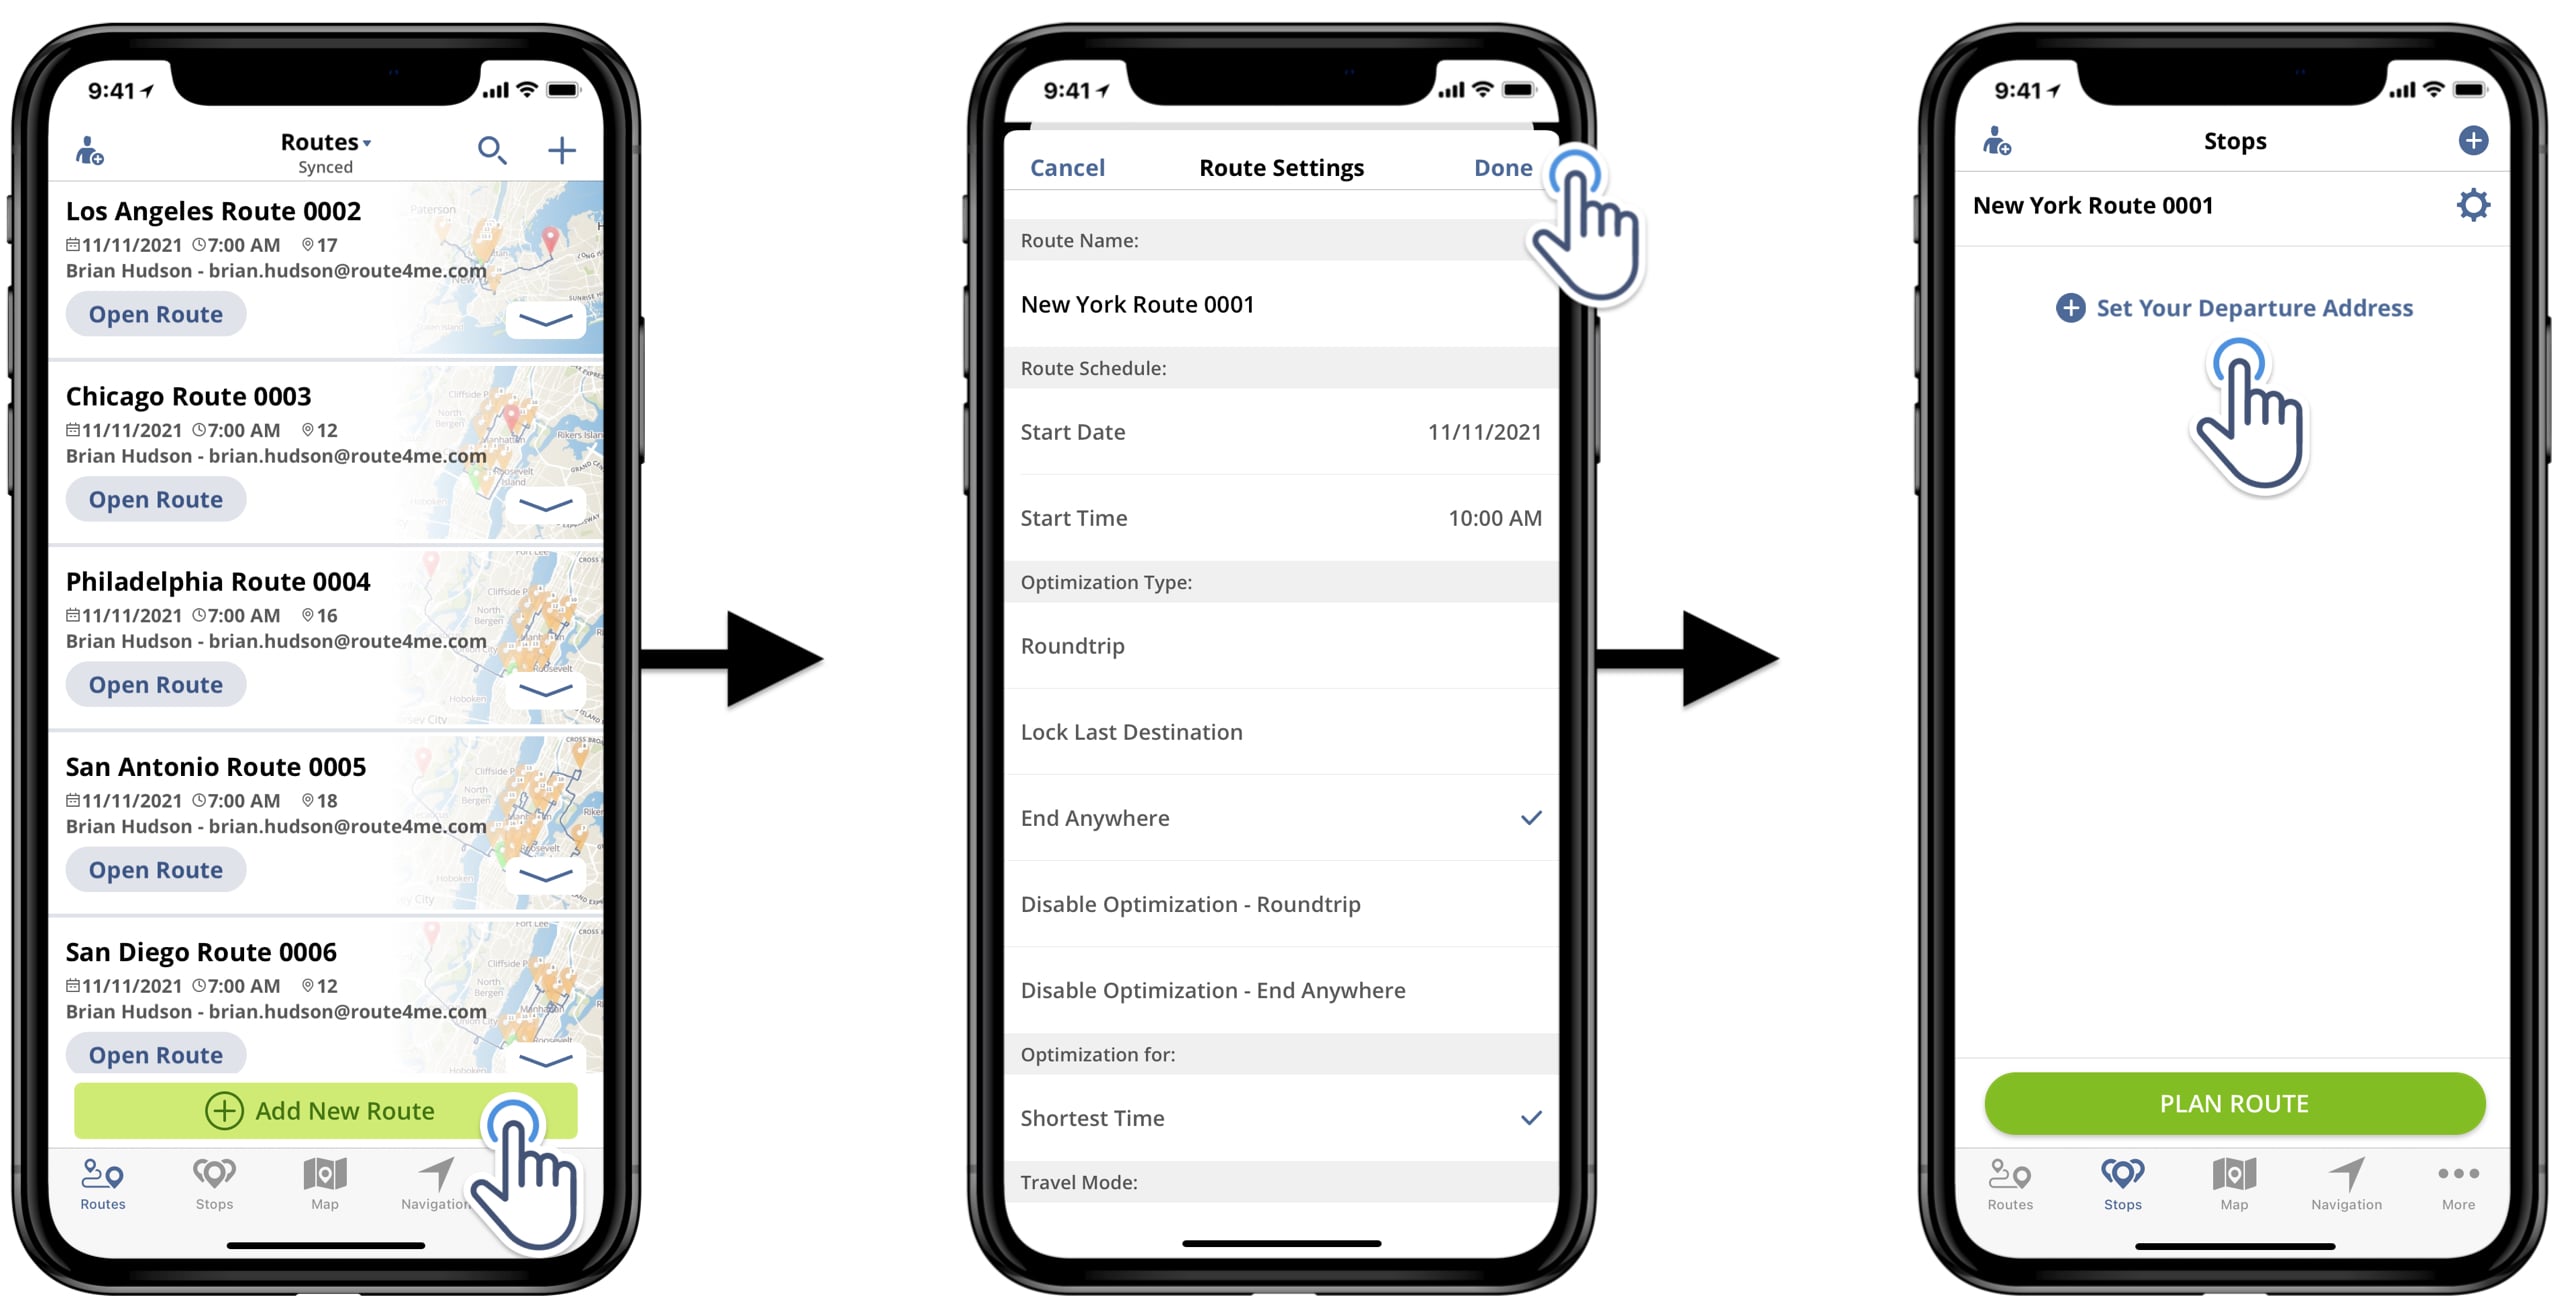
To use the address scanner to plan a new route, go to Routes from the navigation menu and tap on the Add New Route button.
Next, specify route optimization settings, schedule the route, and add the route’s name.
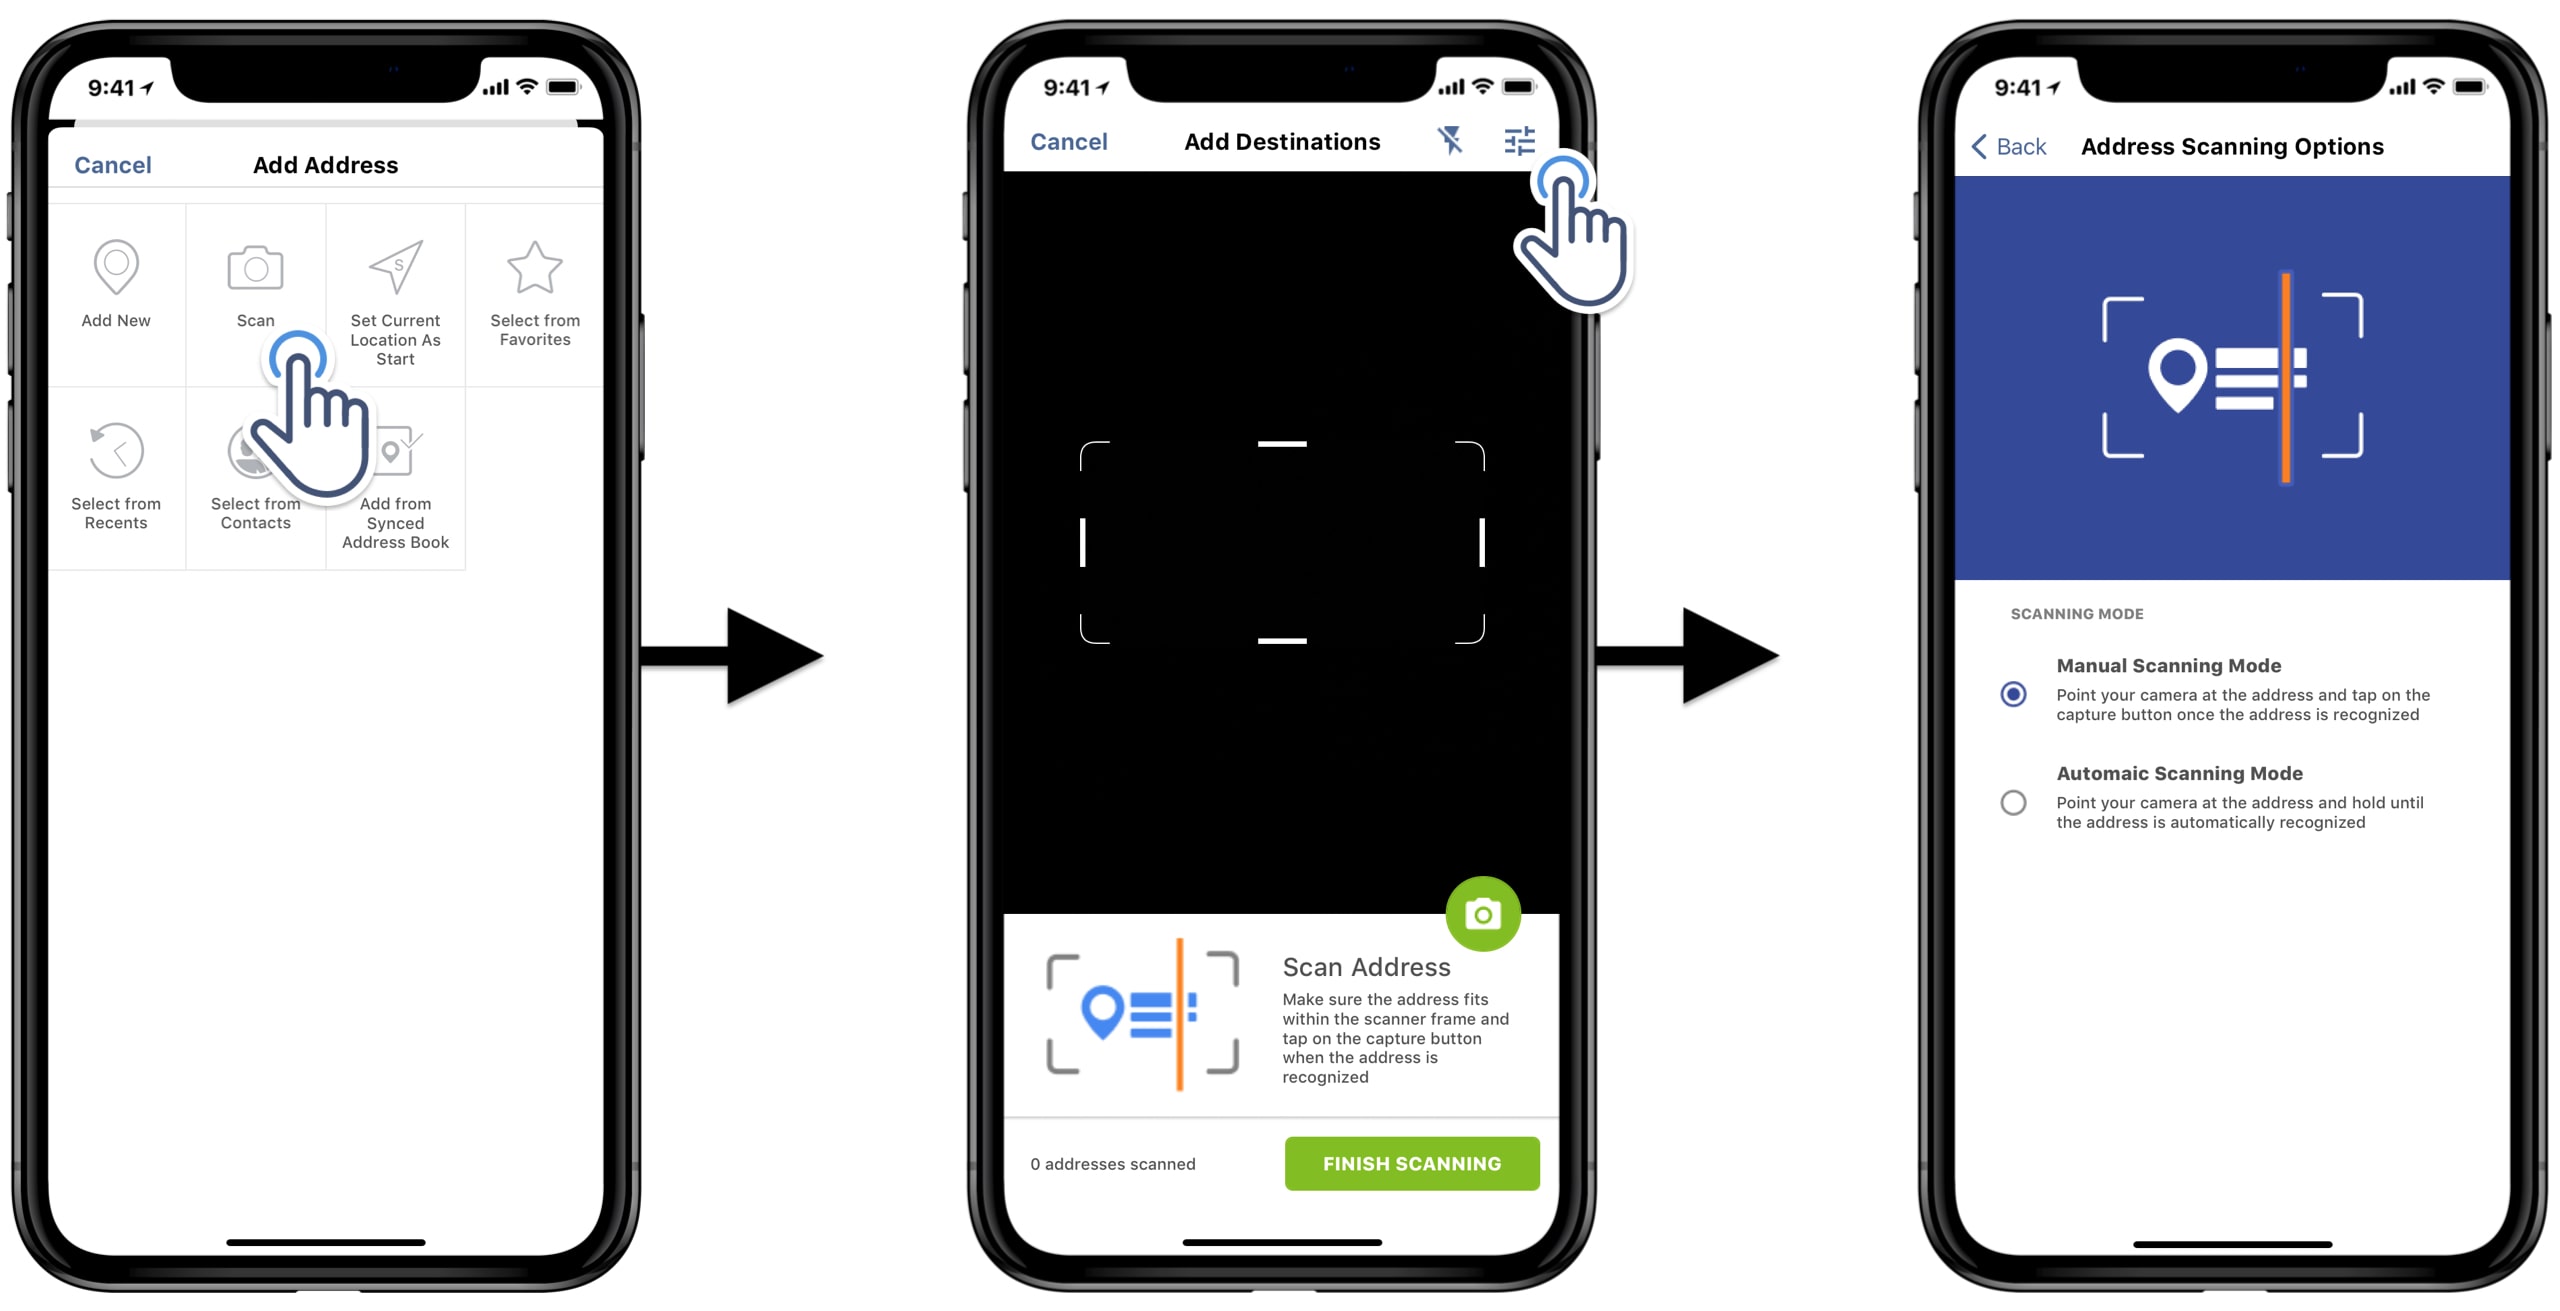
Tap on the Done button in the top right corner of the route planner to save route settings. Then, tap on the Set Your Departure Address button to start adding addresses with the route planner’s in-app OCR scanner.
To use the address cam scanner, select the Scan option. Next, you can adjust the address scanner settings. To change the address scanner settings, tap on the Settings icon in the top right corner of the route planner app:
- Manual Scanning Mode: Point your iPhone or iPad camera at the address and tap on the capture button once the address is recognized.
- Automatic Scanning Mode: Point your iPhone or iPad camera at the address and hold until the address is automatically recognized by the app.
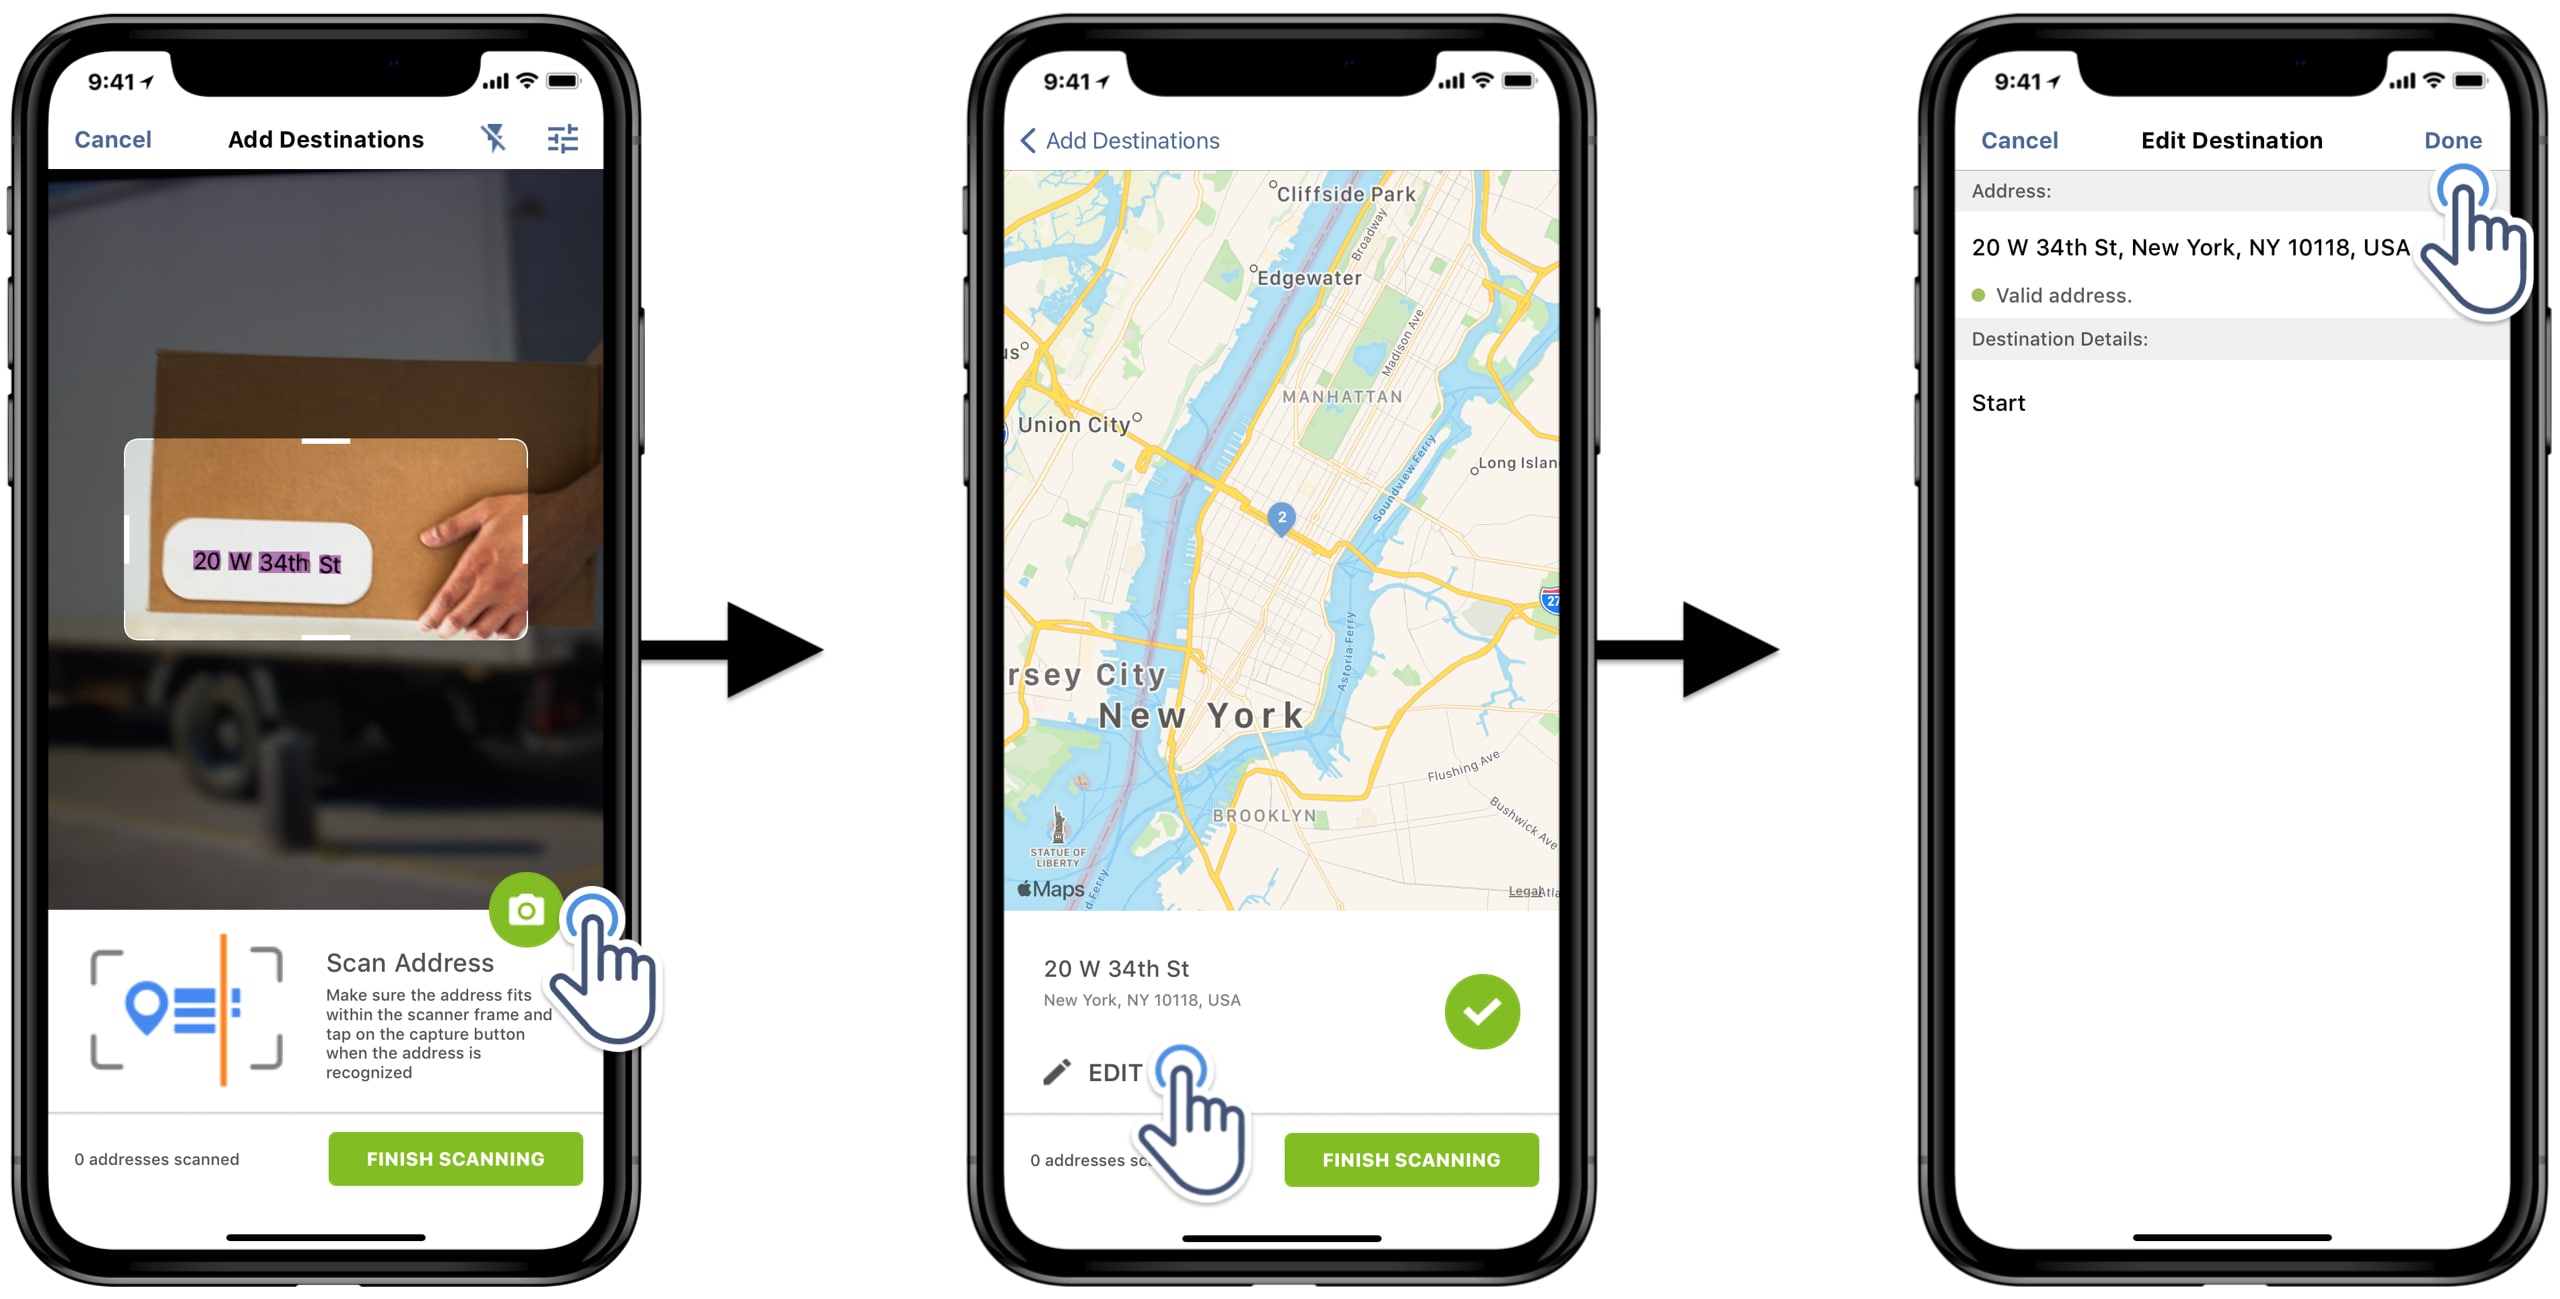
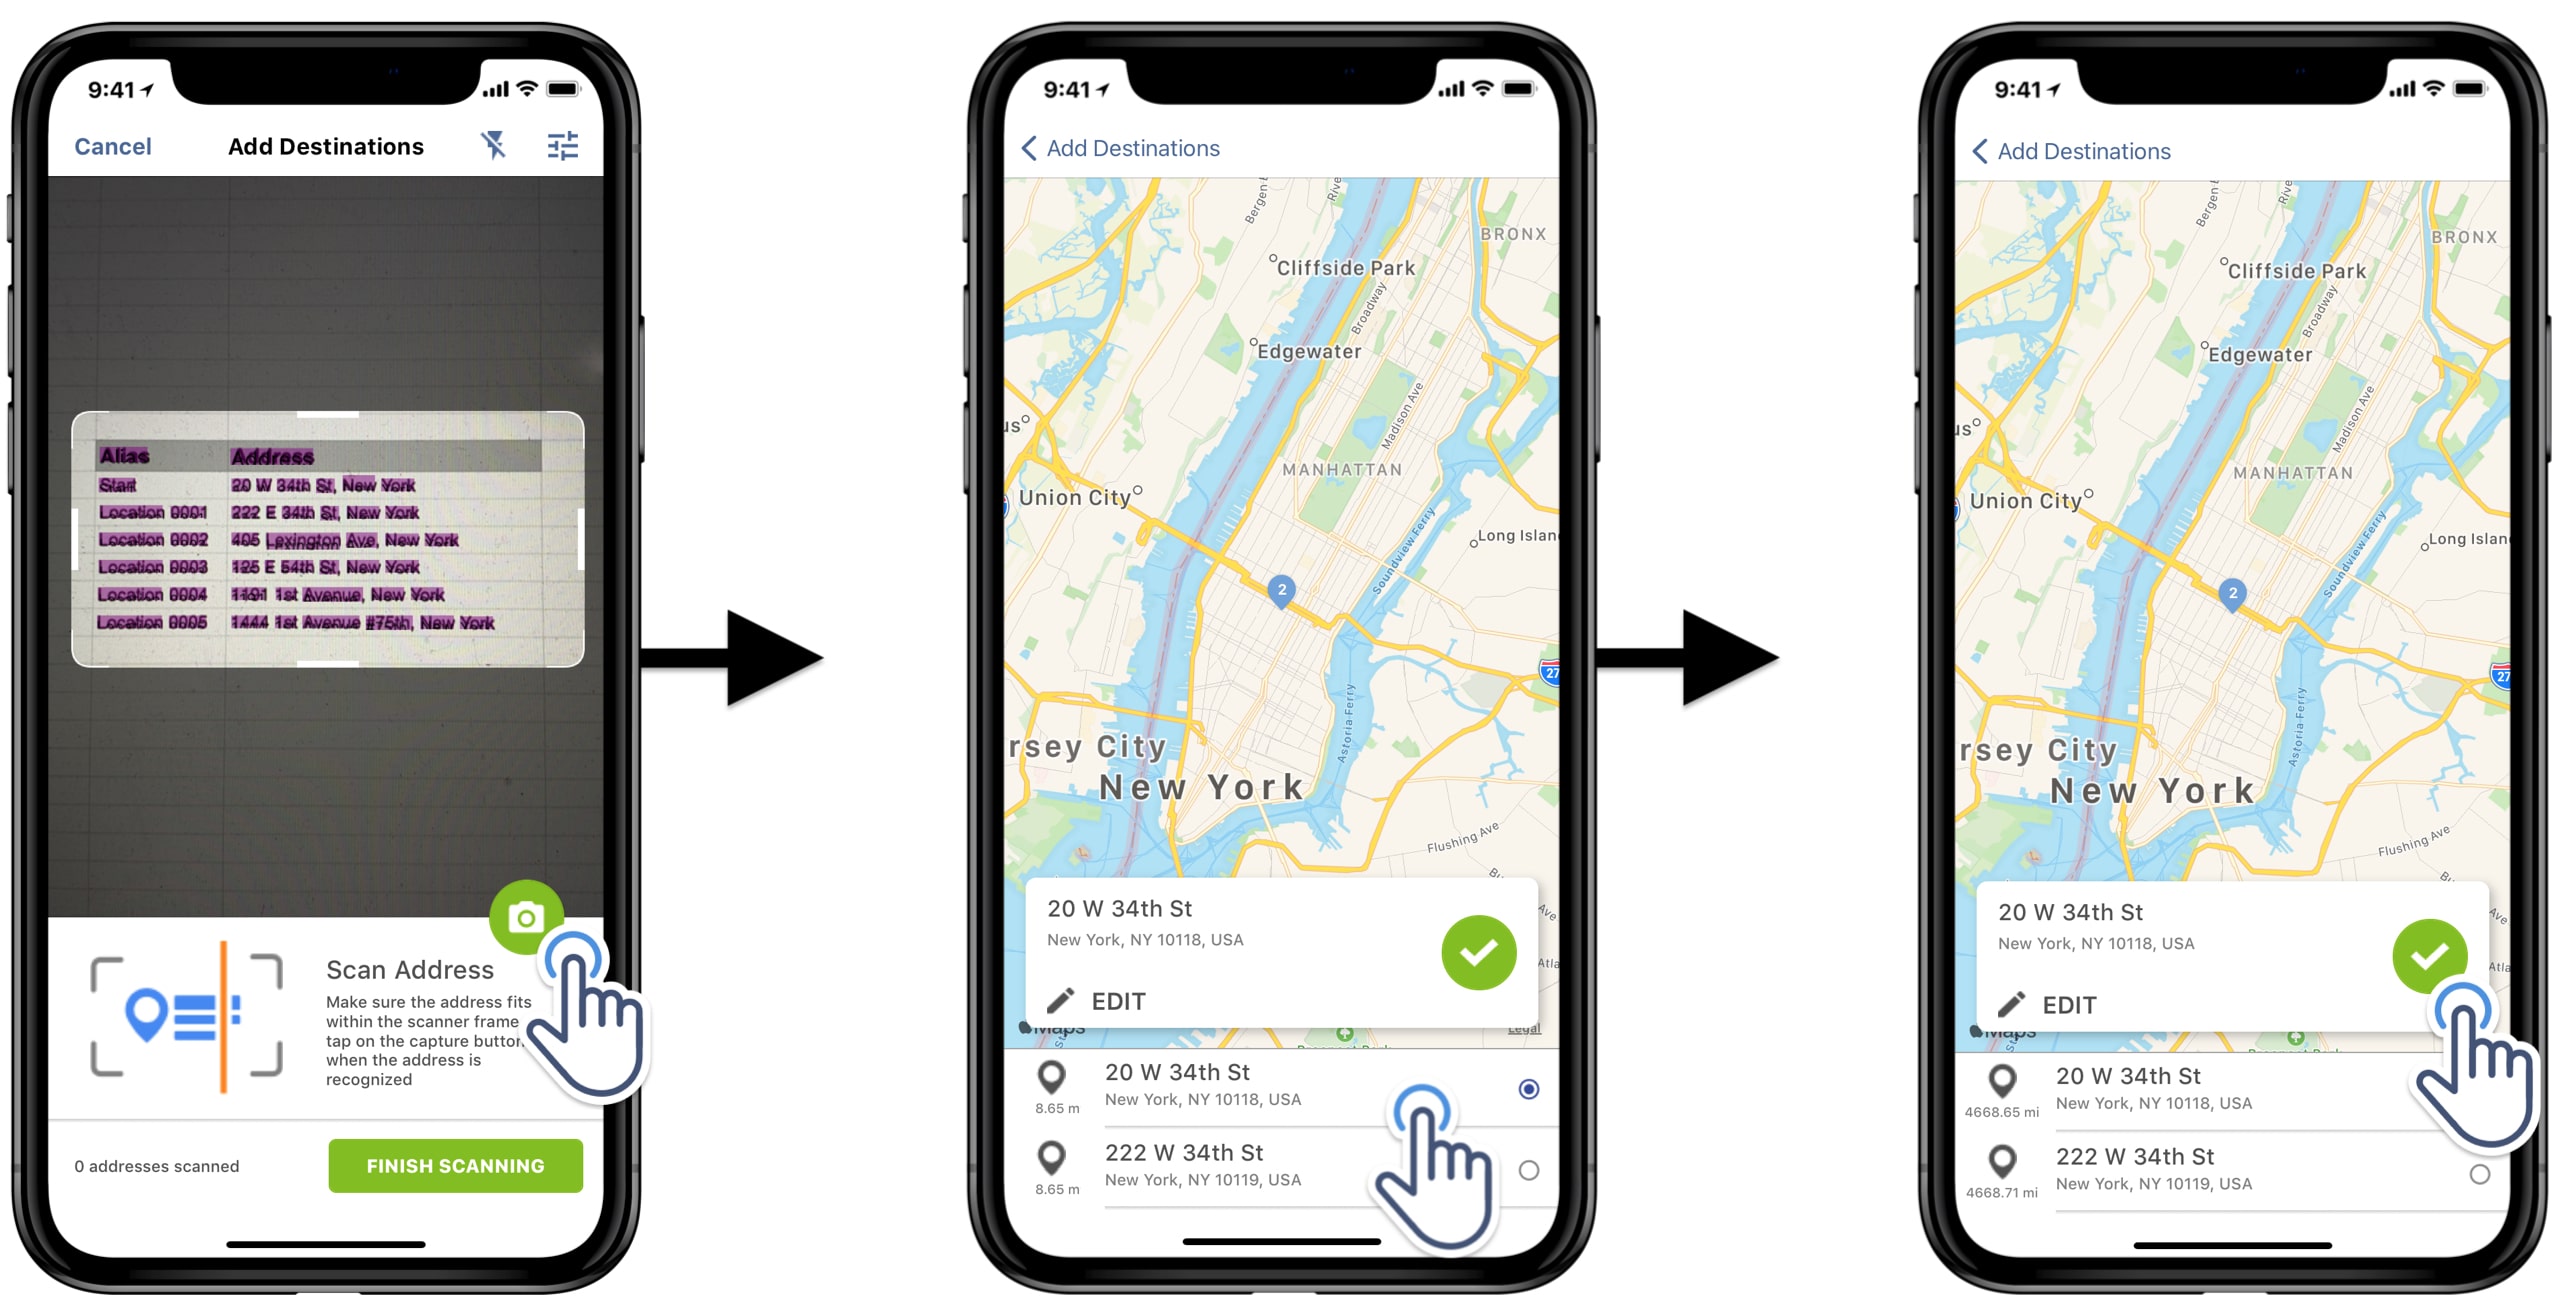
To scan an address, point the OCR scanner at the address and make sure that the address fits within the frame of the scanner. Next, tap on the capture button. Or, depending on the settings, the address will be automatically recognized and saved.
After the address is scanned, the app can offer to select one of the suggested geocoded address options or suggest only the most accurate address option.
After scanning an address, you can also edit it and add an alias to it. To edit a scanned address, tap on the Edit button, edit the address and add an alias, and tap on the Done button to apply the changes.
Route4Me’s in-app address scanner can pick up incorrect or incomplete addresses in various fonts and suggest completed and geocoded addresses.
For example, if you scan an address with a street number only, the route planner will automatically process the recognized text and suggest all matching and available geocoded addresses.
After scanning an address, tap on the Checkmark icon to save this address and then tap on the Finish Scanning button to add the scanned address to the route.
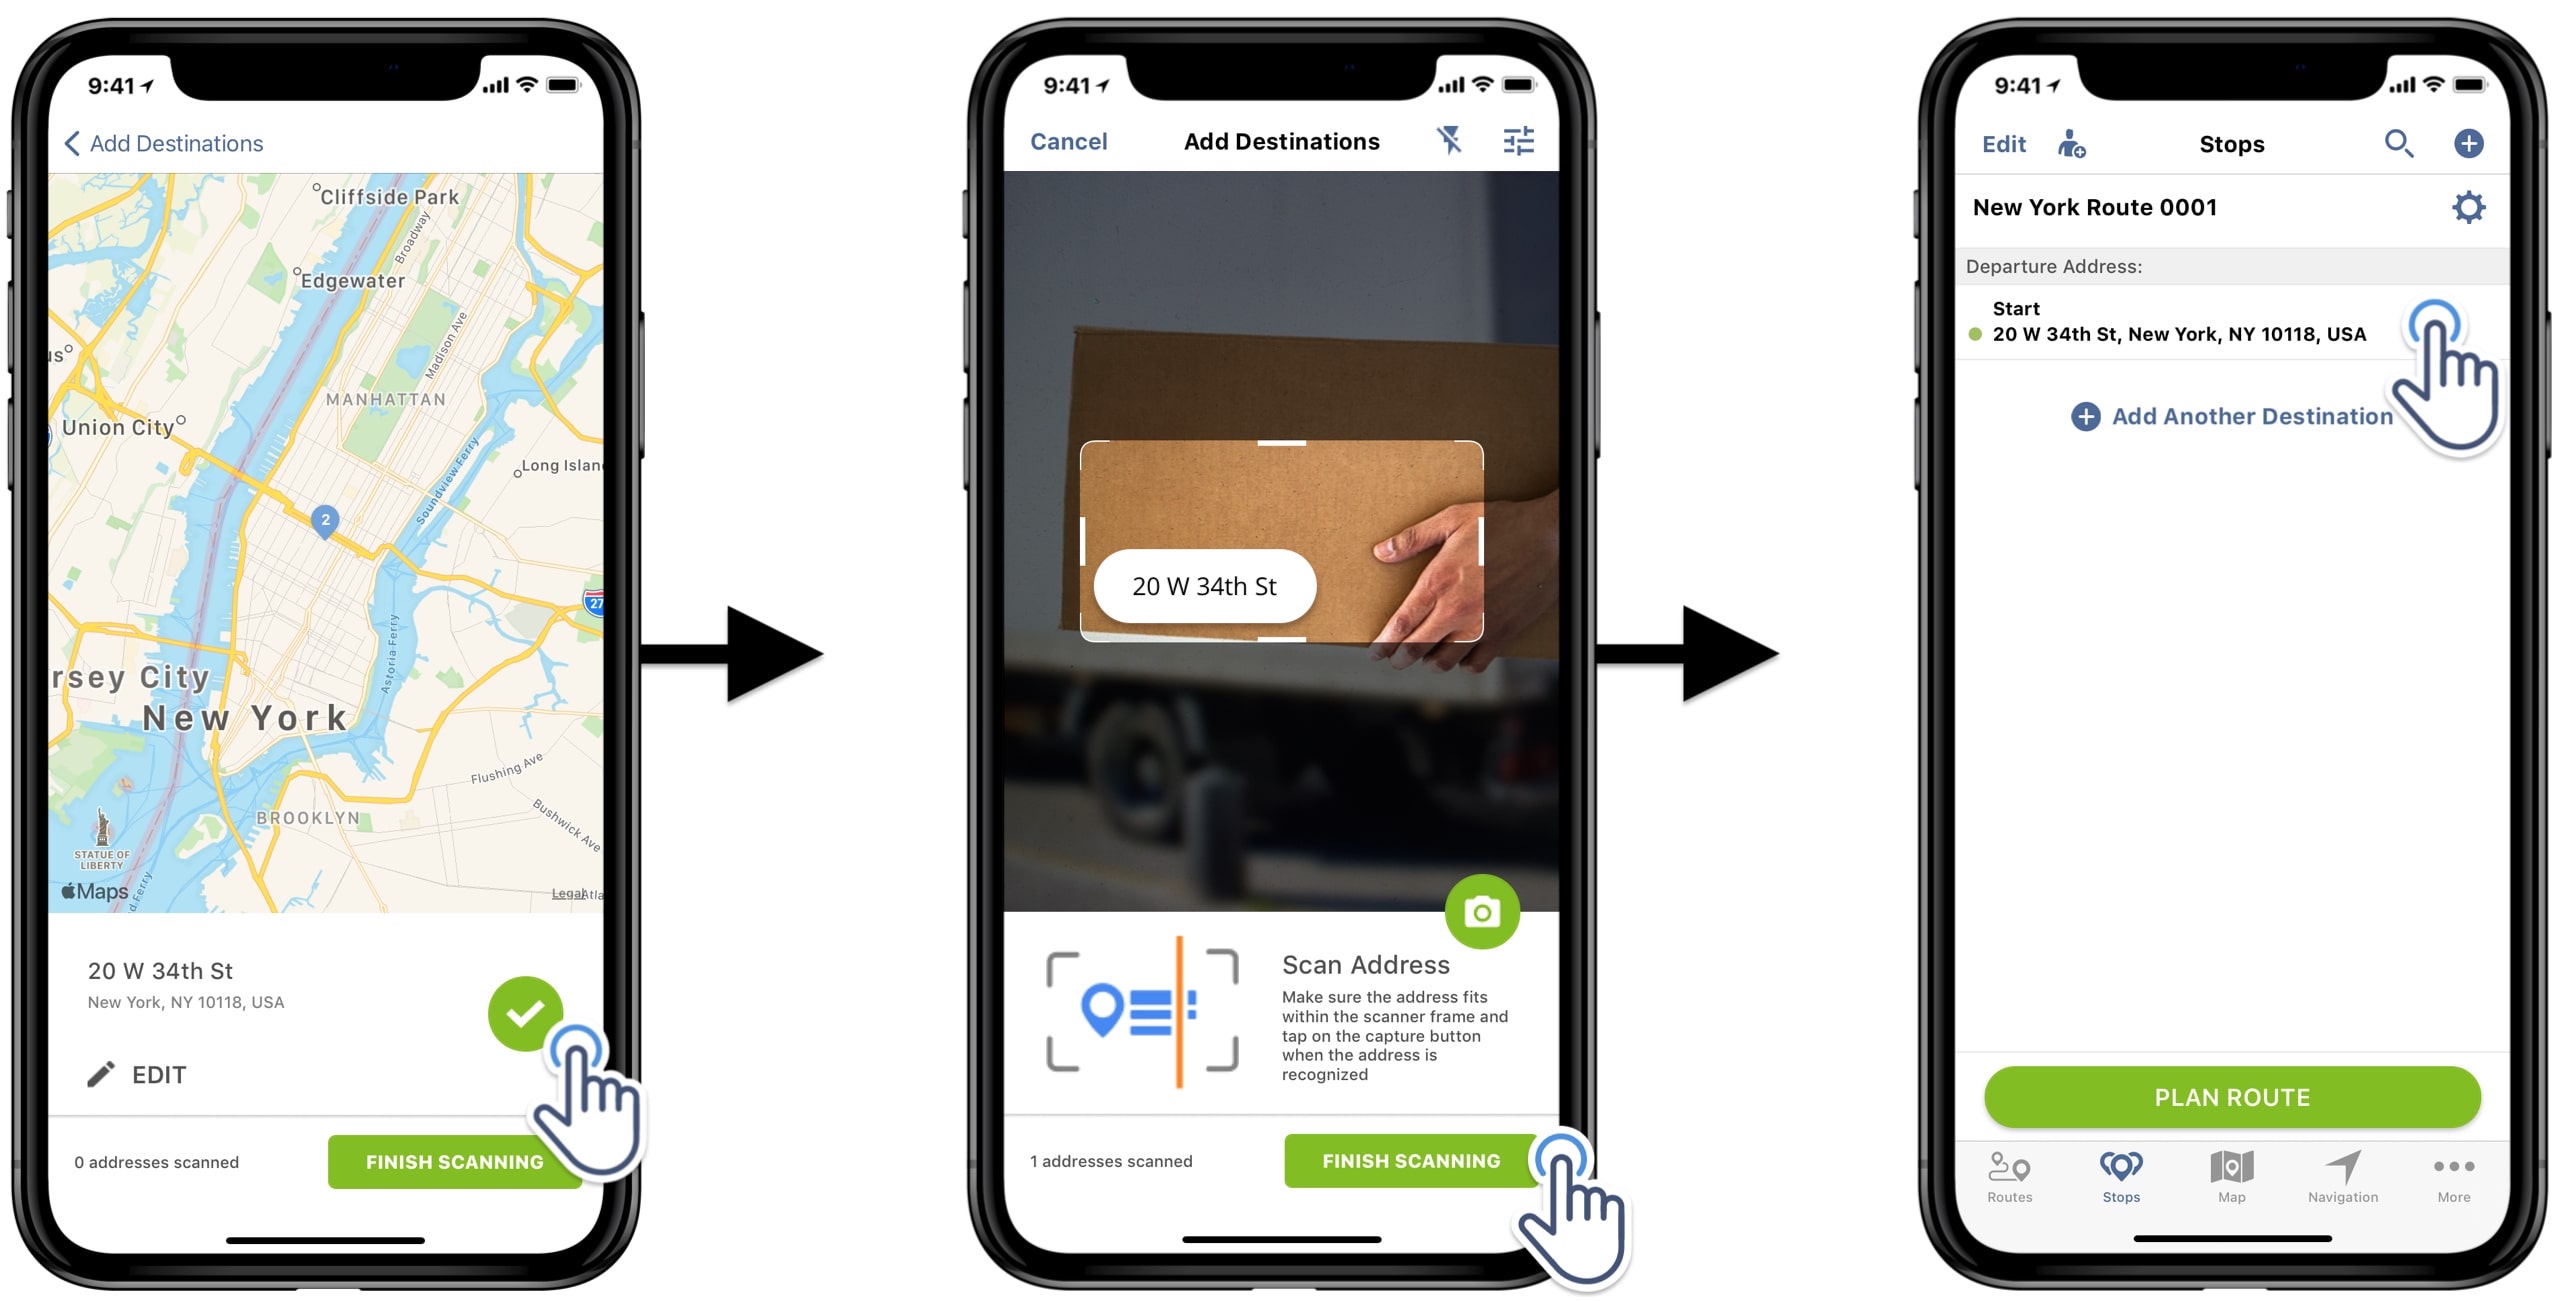
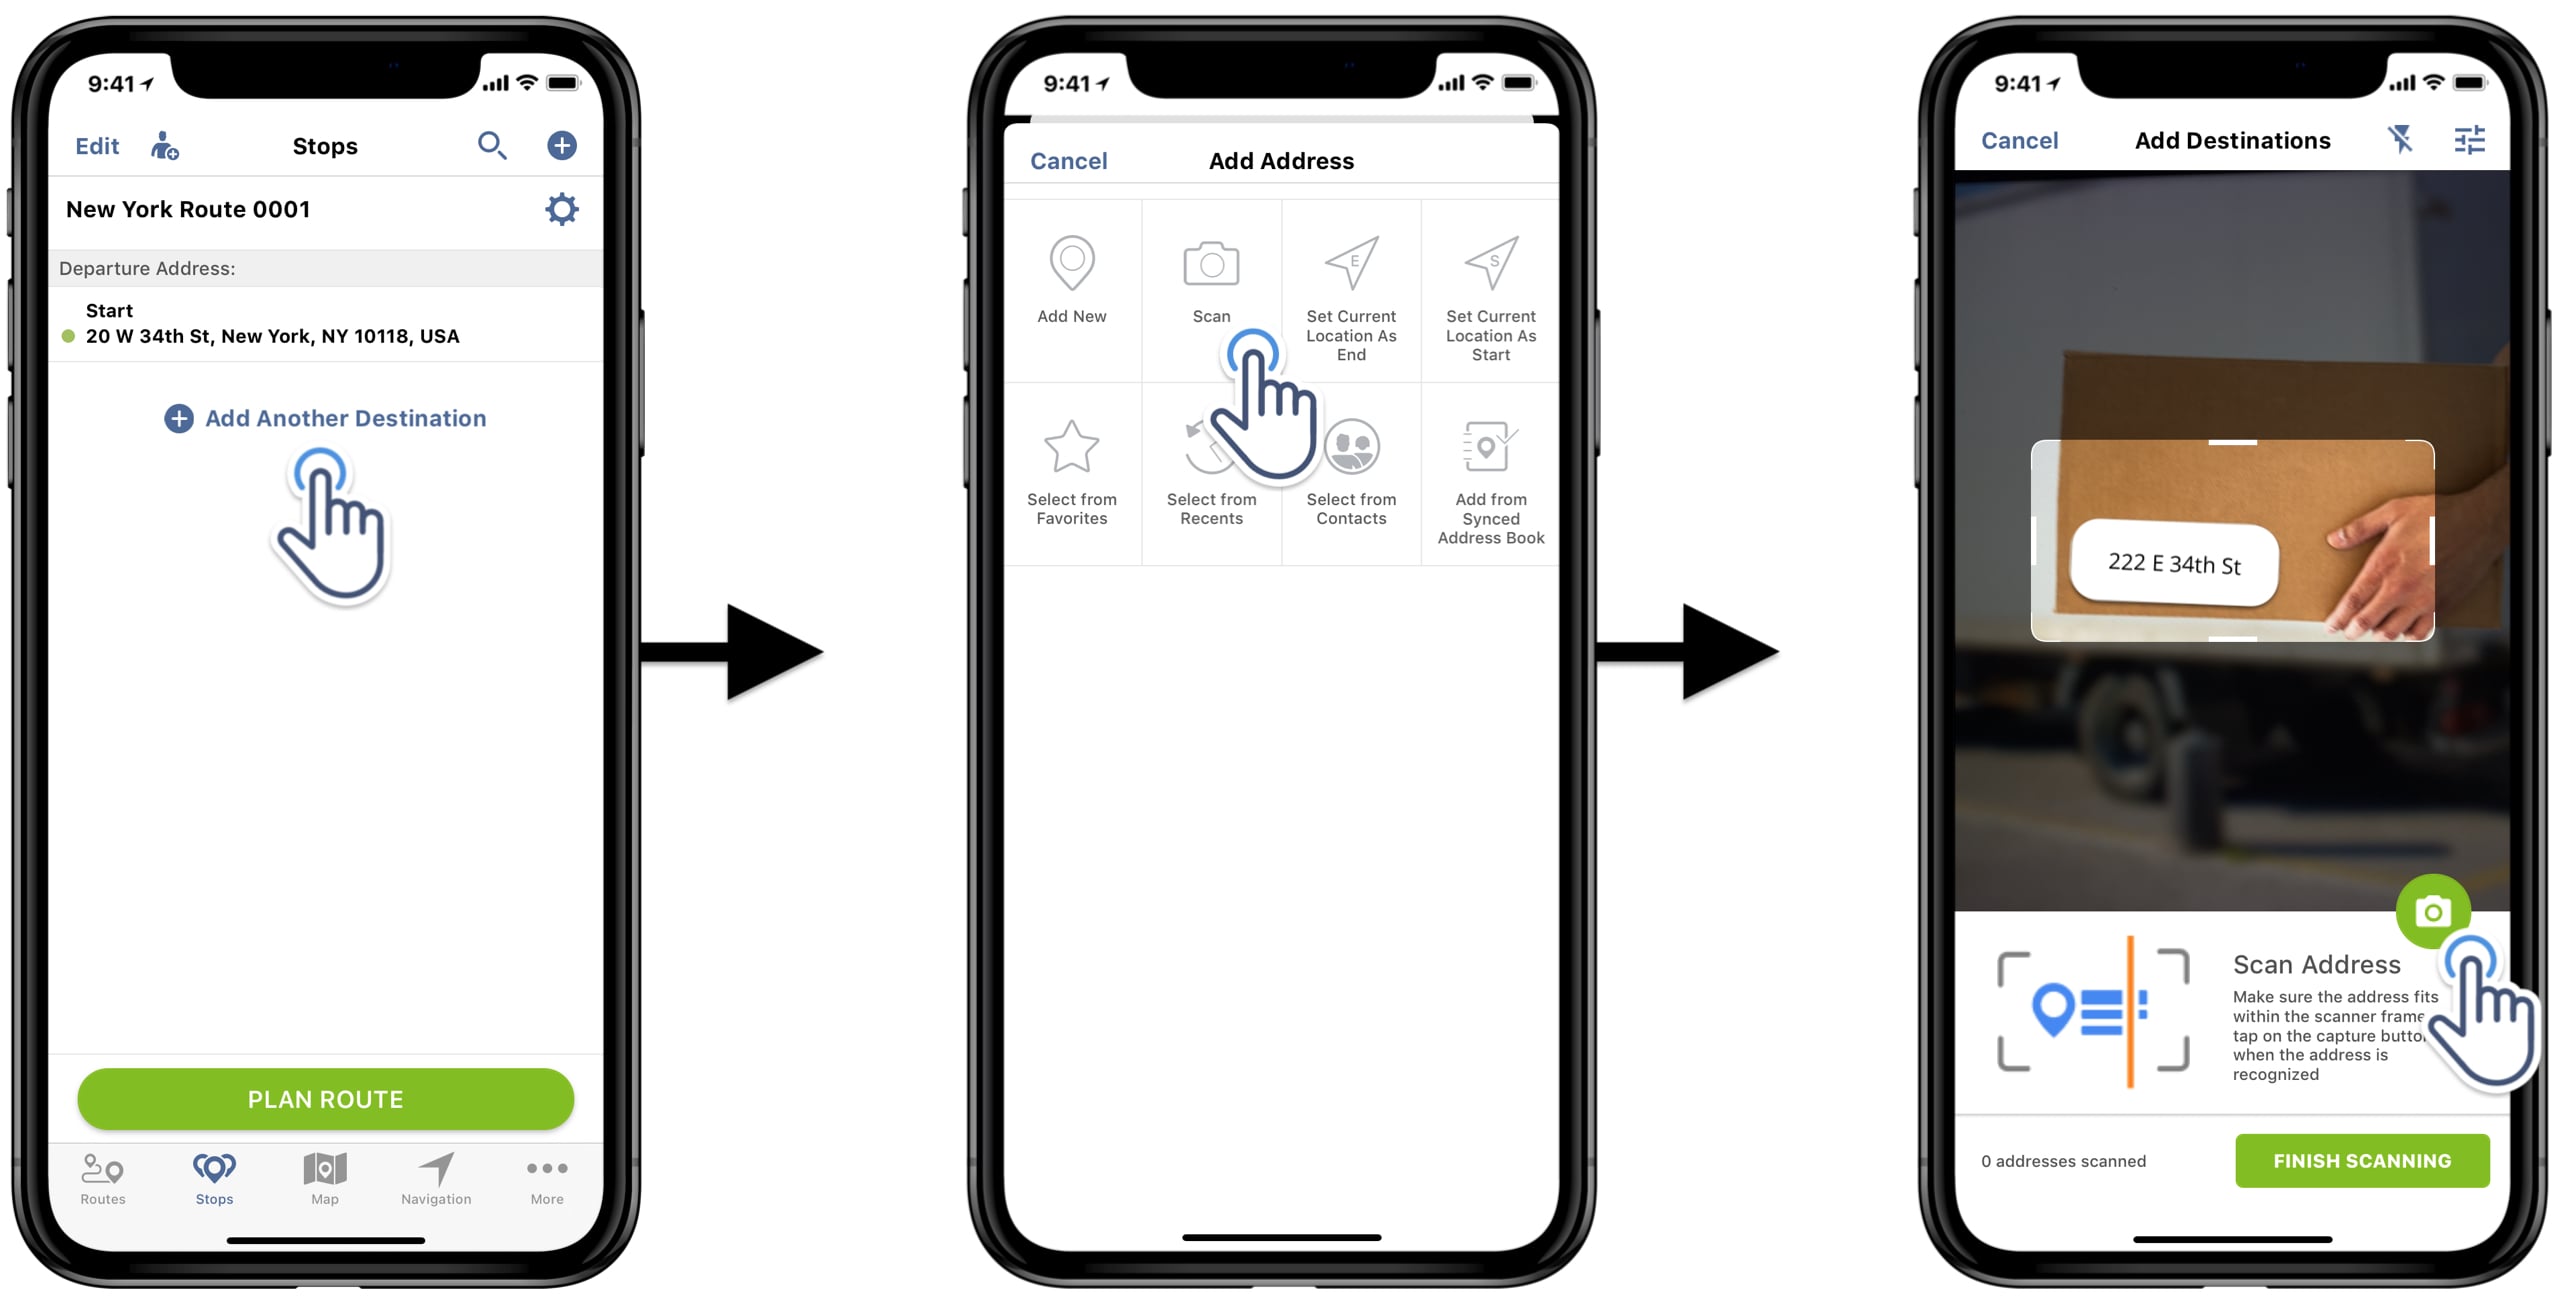
To scan and add more addresses, tap on the Add Another Destination button and then use the route planner’s in-app address scanner to add more addresses.
Route4Me’s in-app address scanner can detect and recognize addresses from different surface types, texts, various lists, even maps, etc.
For example, you can scan a route data spreadsheet with multiple locations and other route details, and the route planner will automatically detect all recognizable addresses.
After scanning multiple addresses simultaneously, the route planner will allow you to choose already geocoded addresses from all the recognized addresses.
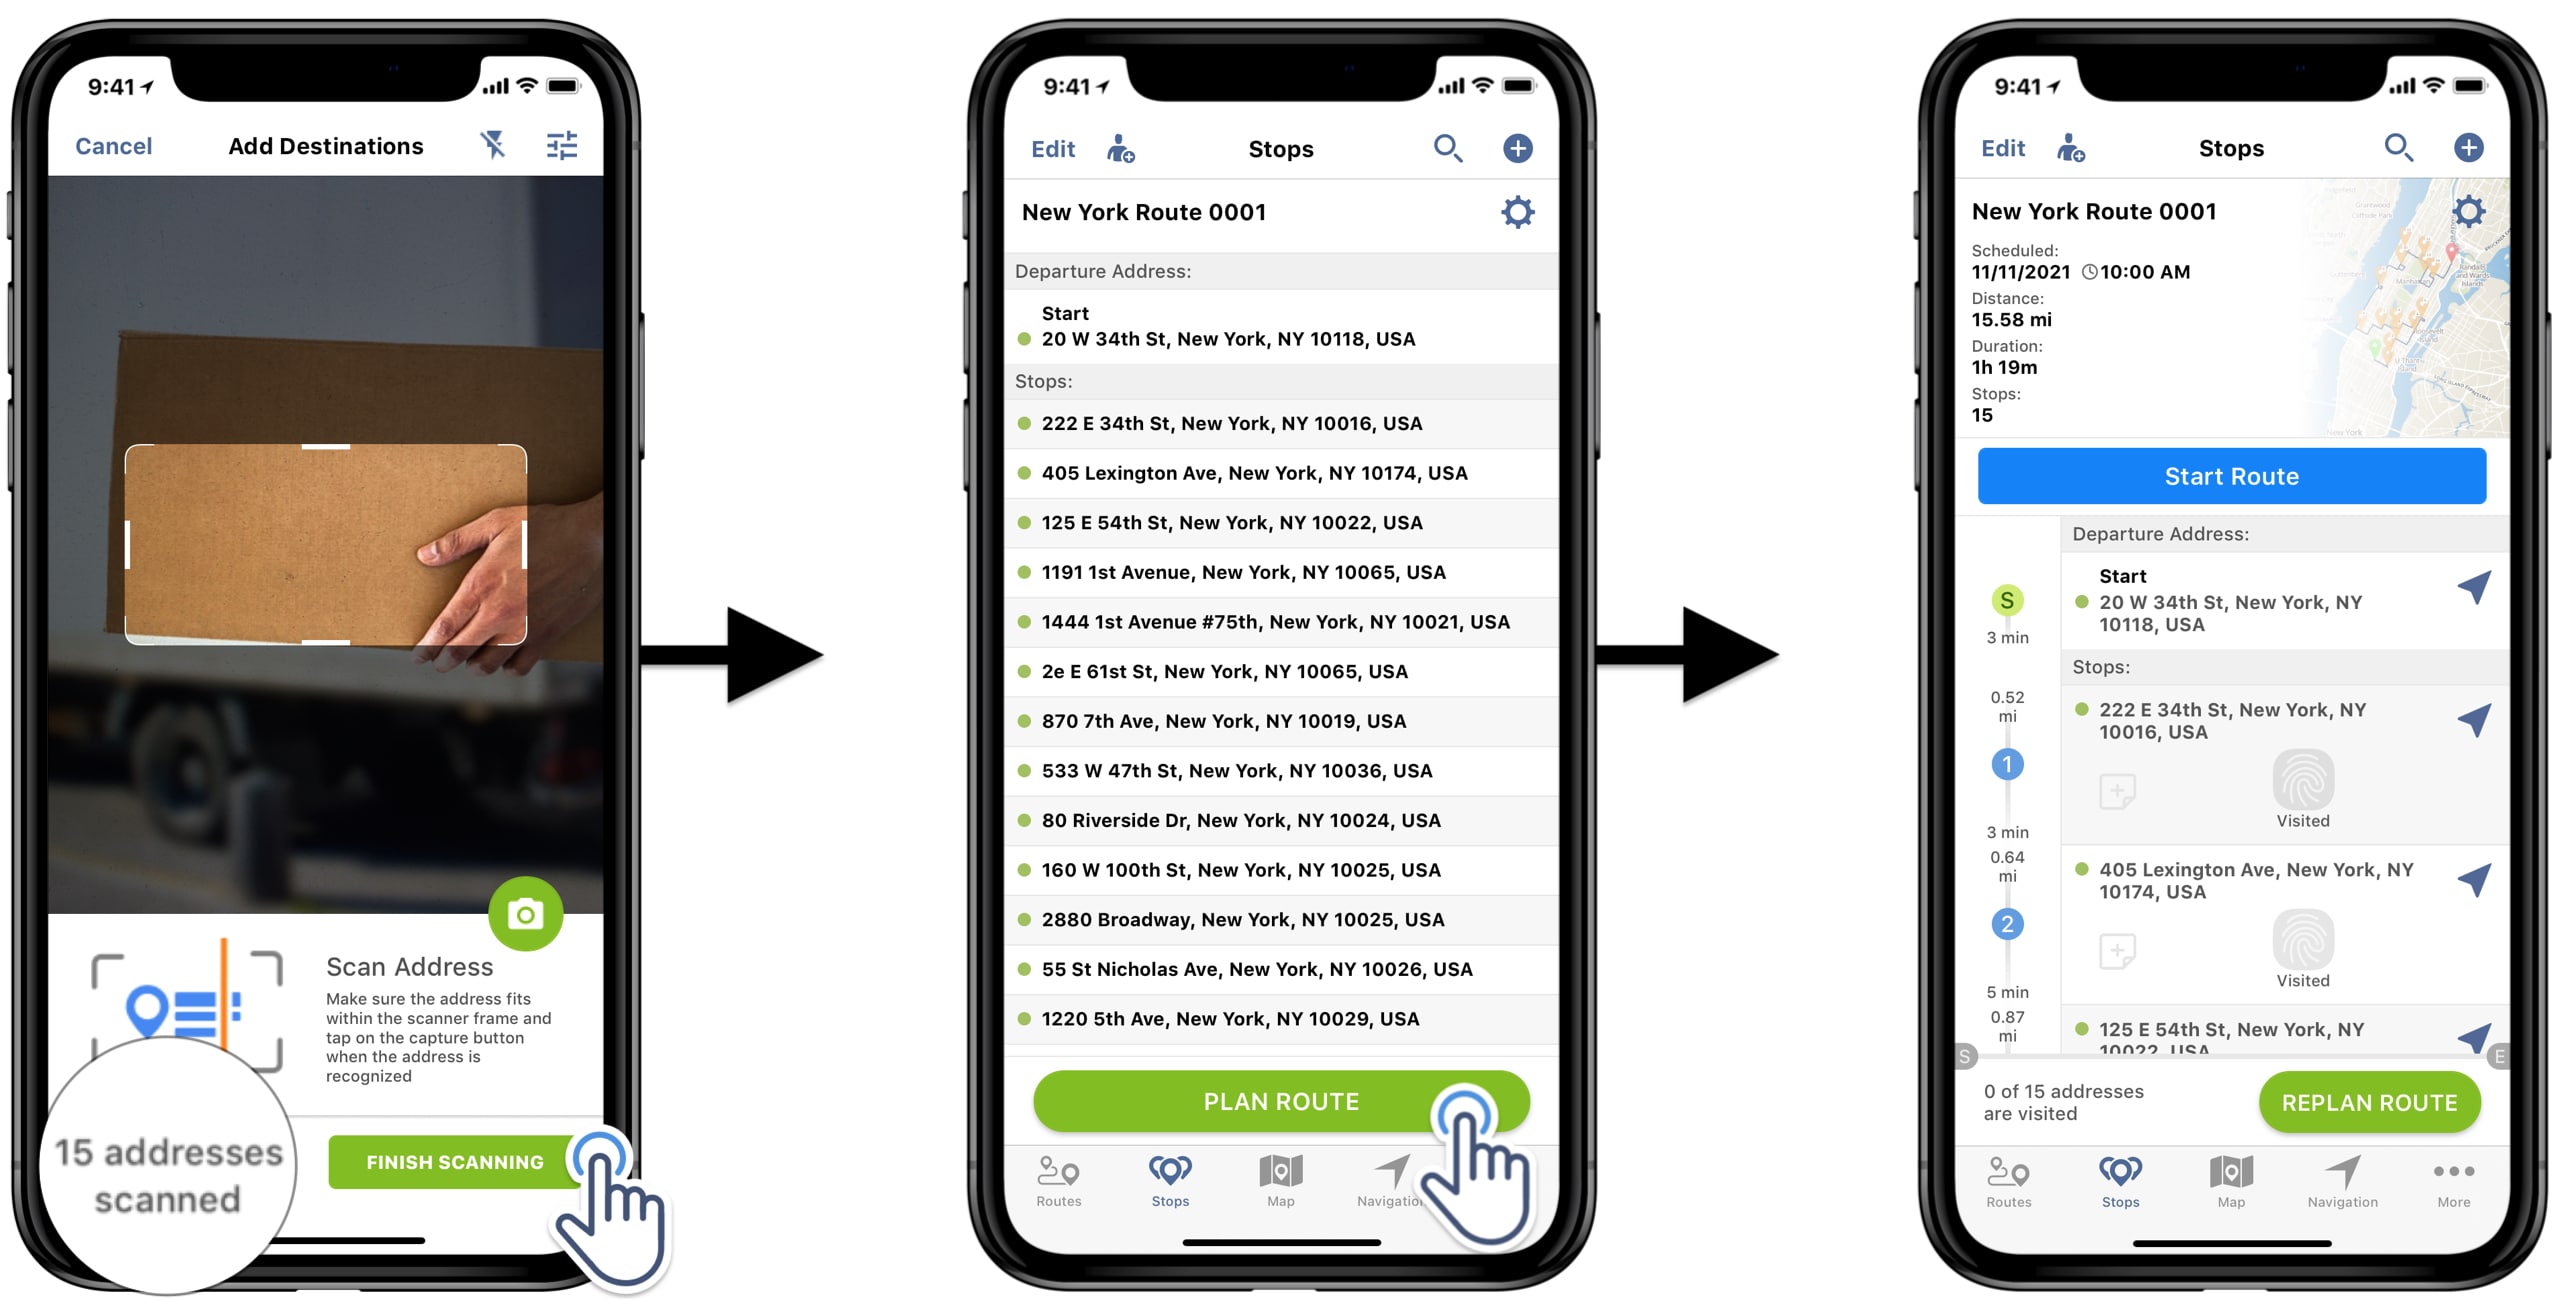
Once you scanned and saved the addresses that you want to add to the route, tap on the Finish Scanning button to proceed to optimize all scanned addresses. The total number of scanned addresses is displayed in the bottom left corner of the route planner’s address scanner.
To optimize the route, after adding scanned addresses, tap on the Plan Route button, and the route planner will optimize all addresses for the most efficient sequence and directions based on the specified optimization settings.
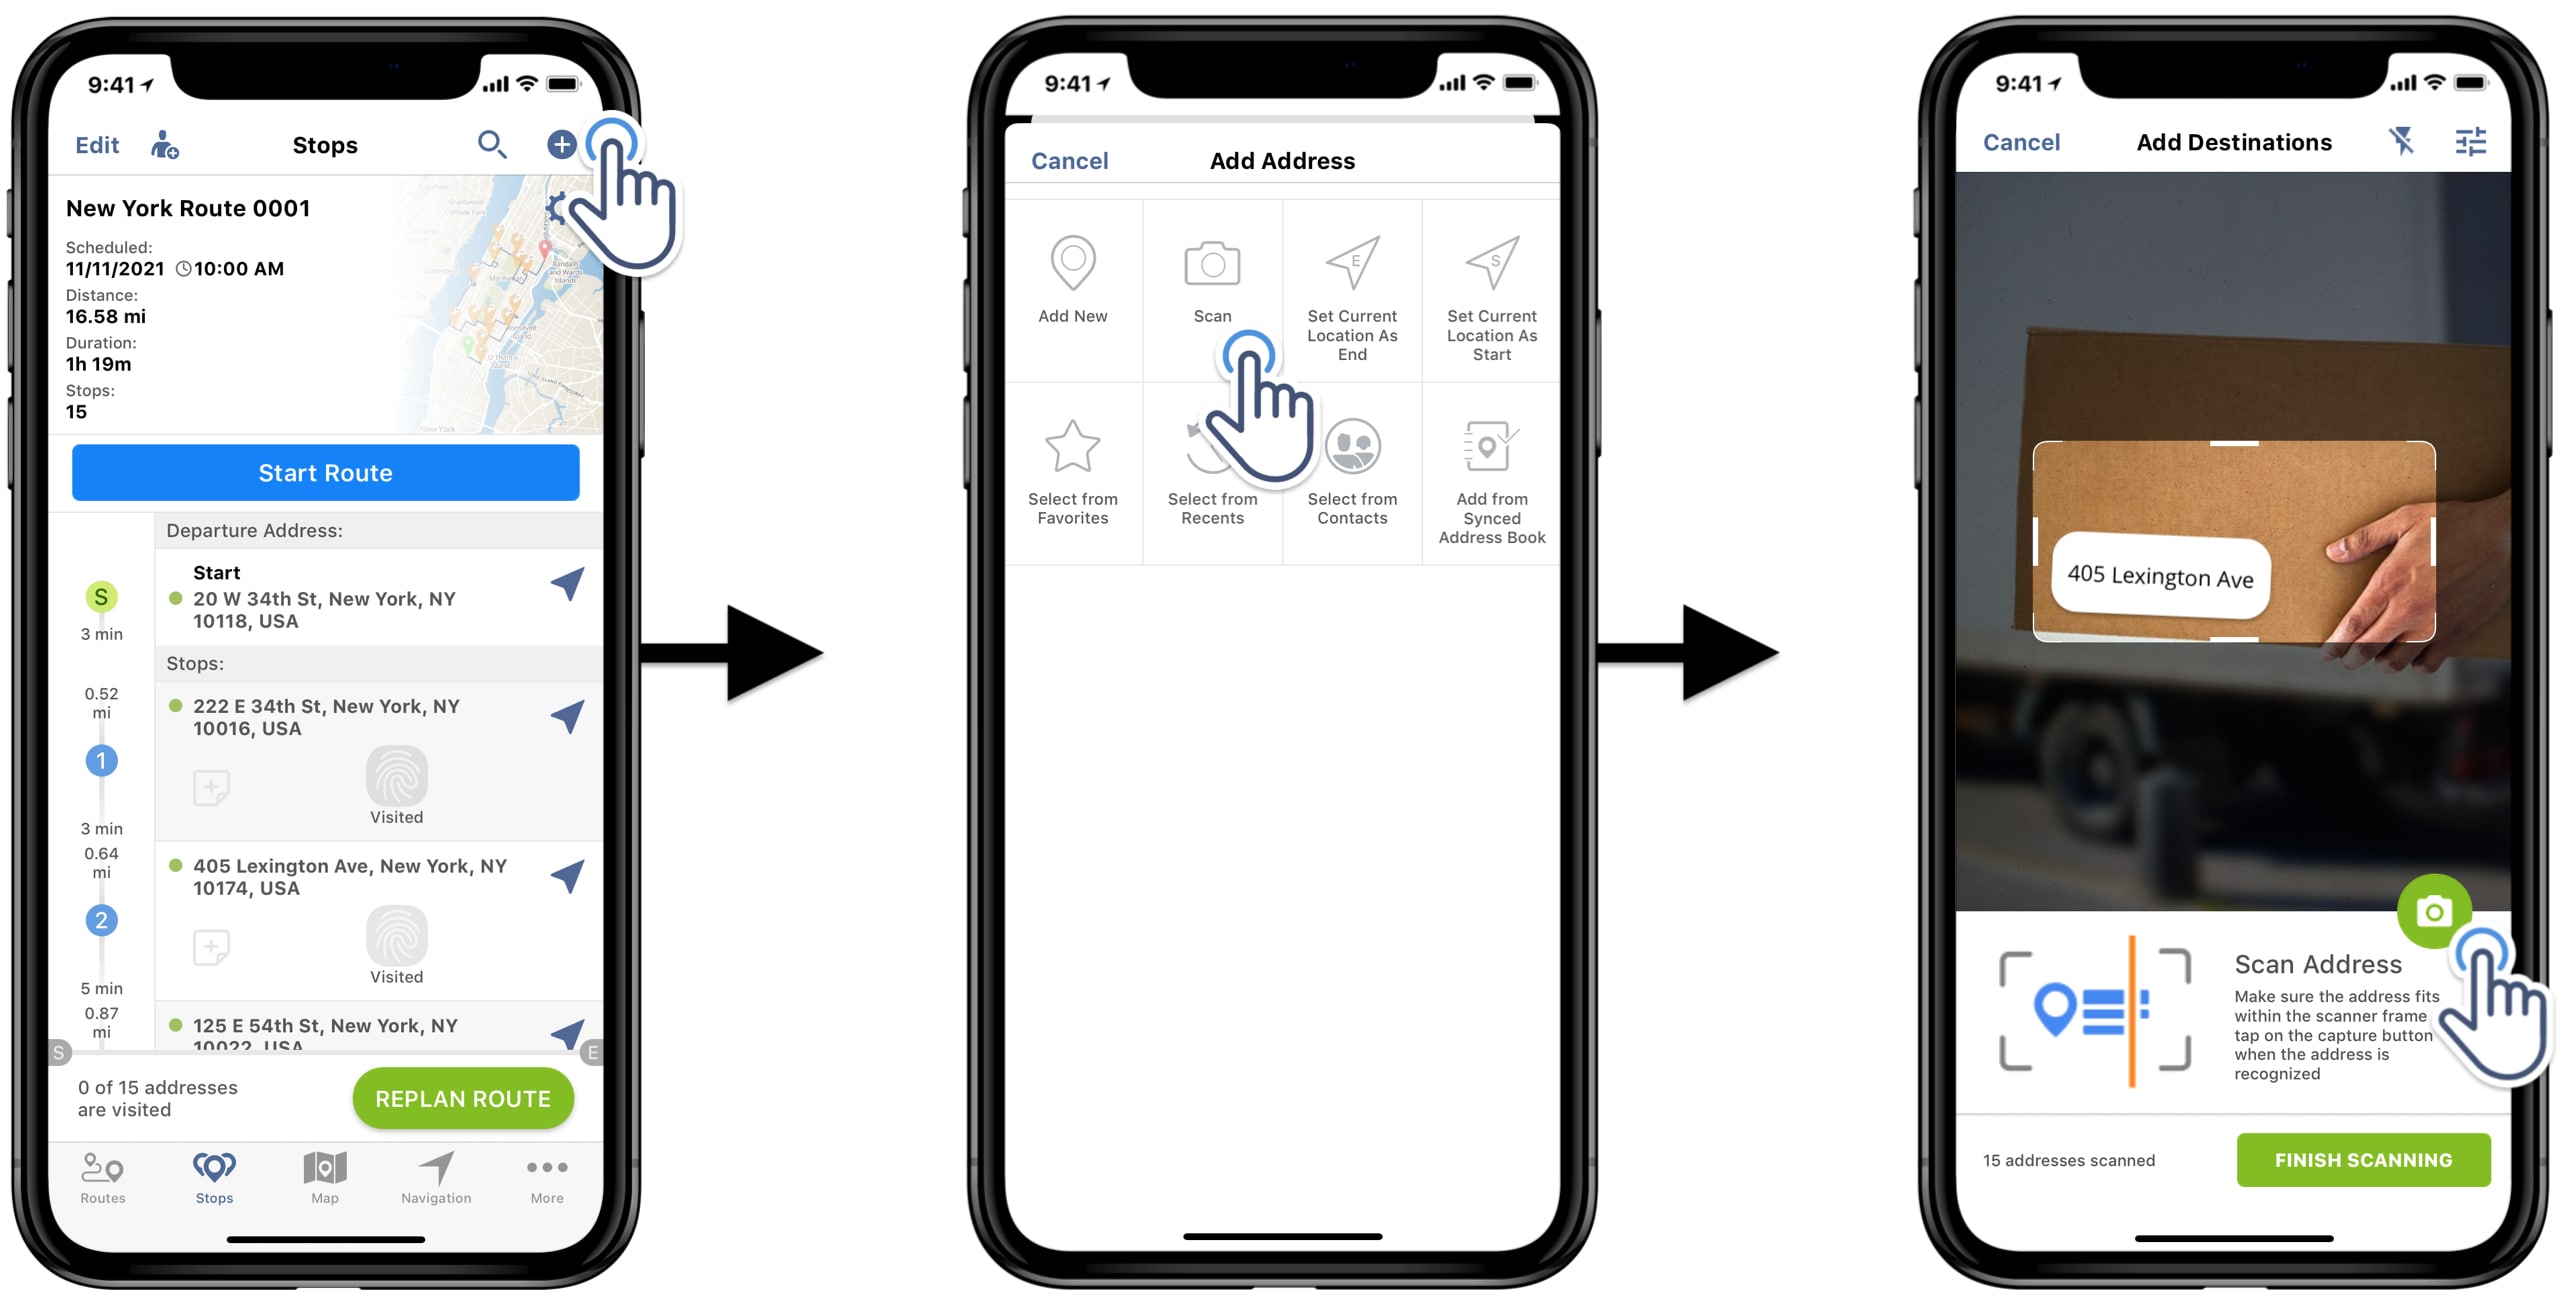
To use the OCR address scanner for adding more addresses to an already planned and optimized route, tap on the Plus icon in the top right corner of the app and tap on the Scan button to use the address scanner for adding new addresses.
Once the route is planned and optimized, you can use the Route4Me route planner app to start and navigate the route using turn by turn in-app voice-guided navigation.

Long story short, get rid of your scanner apps and start using Route4Me’s in-app address scanner today. After all, why would you use multiple apps when you can get everything in one route planner app?
Multi-Stop Route Planner App